Showing posts with label truffles. Show all posts
Showing posts with label truffles. Show all posts
Friday, December 4, 2015

Saturday, November 15, 2014
Dark Chocolate Ginger Truffles
Please visit my new blog, Make It and Bake It with Beth, for the dark chocolate ginger truffles recipe.

Monday, July 21, 2014
Honey and Hemp Milk Chocolate Truffles

Recipe for Honey and Hemp Milk Chocolate Truffles
INGREDIENTS:4 Tbsp. of hemp hearts
2 Tbsp. of coconut oil
2 Tbsp. of wildflower honey
2 - 3 ounces milk chocolate baking chocolate for coating
Extra hemp hearts for topping (optional)
DIRECTIONS:
Put the hemp seeds, coconut oil, and honey into a small bowl and use a spoon to mix well. Cover the bowl and put into the fridge for at least 2 hours. Use a cookie dough scoop to scoop up and use your hands to shape into about 1/2 to 3/4-inch balls and place in a parchment lined container. Cover the container and put into the freezer for at least 2 hours.
Break up the chocolate into small chunks and place into a small saucepan. Set the heat on medium-low and stir constantly until melted. Then drop a honey and hemp ball into the chocolate, use a spoon to coat, and place on a foil lined tray or plate. Sprinkle some hemp seeds on top of the chocolate if desired. Continue until all the honey and hemp balls are coated. Put in fridge to set and then store in an airtight container in the fridge. Serve chilled.
Recipe makes about one dozen truffles.
*Original recipe
Saturday, March 29, 2014
Dark Chocolate Lemon Truffles (made with chocolate chips)

Recipe for Dark Chocolate Lemon Truffles (made with chocolate chips)
INGREDIENTS:
1 1/4 tsp. of lemon zest
5 ounces of Ghiradelli semisweet premium baking chips
2 tsp. of freshly squeezed lemon juice
Cocoa powder
1/2 ounce of bittersweet or unsweetened baking chocolate, grated with a box grater (optional)
Cacao nibs (optional)
Extra chocolate chips, for topping
DIRECTIONS:
Put the heavy cream and the lemon zest into a small saucepan and set over medium heat. Once it simmers, remove from heat and pour in the chocolate chips. Cover the saucepan for 5 minutes. After 5 minutes, gently stir the mixture until it is completely smooth. Gently stir in the lemon juice. Cover the saucepan (make sure to wipe the lid of any moisture before covering) and set in the fridge for several hours or overnight.
Put the cocoa powder into a shallow bowl. Lightly dust your hands with the powder. Scoop up some of the mixture and then use your hands to roll into 3/4-inch balls. Dust with more cocoa if desired. Continue until the mixture is gone. Then roll each ball into the grated chocolate, cacao nibs, or a combination of both. You might need to use your fingers to gently press down the grated chocolate/cacao nibs onto the truffles. Top each truffle with a chocolate chip. Put truffles into the fridge until you are ready to serve.
Recipe makes approximately 16 - 20 truffles. About 55 calories per truffle.
Recipe inspired by various cookbooks in my home and sources on the web.
Wednesday, February 12, 2014
Dark Chocolate Raspberry Truffles


Please visit my new blog, Make It and Bake It with Beth, for the recipe for Dark Chocolate Raspberry Truffles.
Saturday, December 21, 2013
Peanut Butter and Pretzel Truffles

Recipe for Peanut Butter and Pretzel Truffles (Makes about 50)
INGREDIENTS:
4 cups of crushed salted pretzels (about 6 - 7 cups of whole pretzels)
4 Tbsp. of unsalted butter, softened at room temperature
1 1/4 cups of confectioners (powdered) sugar
12 - 16 ounces of semisweet baking chocolate (I used Baker's brand)
Coarse sea salt and/or coarse sugar for sprinkling (optional)
DIRECTIONS:
To crush up the pretzels, place them into the bowl of a food processor and pulse several times until they are at the size you want. You can make the pretzel pieces chunky or fine, just don't turn them into a powder! Then measure out the crushed pretzels into four cups, if you need more, add more whole pretzels to the food processor and pulse.
Scoop the peanut butter into a large bowl. Add in the pretzels, unsalted butter, and powdered sugar. Use an electric hand mixer set on medium speed to briefly blend the ingredients, then use a large spoon to mix well until ingredients are combined and well incorporated. Line a baking sheet with parchment paper. Use a cookie dough scoop to scoop up batter and form into 1-inch balls with your hands. Place each ball on the baking sheet. Then place the baking sheet in the freezer for 45 minutes to an hour.
Break the chocolate into small pieces (start with 12 ounces of chocolate - if you use it all, then you can melt the remaining 4 ounces) and place in the top pan of a double boiler. Prepare the bottom pan of the double boiler with water and set over medium high heat until steam starts to rise. Then place the pan with the chocolate on top and stir the chocolate until it is completely melted. Turn the heat off. Take the peanut butter pretzel balls out of the freezer. Drop one ball into the chocolate and use a spoon to coat. Place back on the baking sheet and sprinkle with the sea salt or sugar. Continue until all balls are coated with the chocolate. Place in the fridge to harden for about 30 minutes. Store in an airtight container for up to one week.
Recipe source: Annie's Eats

Wednesday, November 20, 2013
Gender Reveal Cheesecake Truffle Pops

Since I had gotten so excited about making the truffles I decided to make both fillings - pink and blue. I shared them with my family, friends, and coworkers and let them know that I was either having a boy or a girl - surprise! Well, I went back today and I found out what I am having.
So, is it pink or is it blue? Let's look at the recipe, then we'll find out!

Recipe for Gender Reveal Cheesecake Truffle Pops
INGREDIENTS:3 8-ounce packages of cream cheese, softened at room temperature
1 cup plus 2 Tbsp. of granulated sugar
1 tsp. of pure vanilla extract
3 eggs, at room temperature
9 - 10 ounces of your favorite kind of baking chocolate (I used dark chocolate)
Pink or blue food dye or gel
Lollipop sticks
Decorative sprinkles
DIRECTIONS
Preheat the oven to 350 degrees. Generously grease the bottoms and sides of a spring form pan with butter. In a large bowl, mix together the cream cheese, sugar, and vanilla with an electric hand mixer set on medium speed. Mix for a few minutes until ingredients are well incorporated. Beat in the eggs, one at a time, mixing on low after each addition. Then mix on medium-high for a few minutes or until the mixture is completely smooth. Add in the pink or blue food dye or gel. Add just a tiny amount at a time and mix until you reach a good color. Then pour the batter into the prepared pan and bake in the oven for 35 - 40 minutes, watching closely so it does not burn on the top. It is done when the center is firm but it still jiggles a bit when you gently shake. Remove from oven. Let cool completely, then transfer to the fridge. Let cool in the fridge for at least 2 hours, or overnight.
Remove the cheesecake from fridge. Use a cookie dough scoop to scoop up some of the cheesecake and then use your hands to roll into a 1-inch ball. Place each ball in a foil-lined container(s). Cover the container(s) and place in the freezer for a couple hours or more.
Line a baking pan with parchment paper. Set by the stovetop. Place sprinkles (and a spoon to sprinkle with) in a smallish bowl. Break chocolate into small pieces and place in a pan that will go on top of the double boiler. Prepare the double boiler with water, place it over medium heat, and set the pot with the chocolate on top. Stir frequently (when chocolate is almost fully melted, remove cheesecake balls from freezer and uncover) until the chocolate is fully melted. Drop a ball into the chocolate and use a spoon to coat. Place on the parchment paper and top with sprinkles. Continue this process until all are dipped. Then carefully pick up one with your hands and insert the lollipop stick in until it holds. Lay sideways on the parchment paper and then continue with the other ones until you are finished. Place the pan with the truffle pops in the fridge and allow to harden before serving (about 20 minutes). Enjoy!
Recipe makes about 2 dozen truffle pops.
Recipe adapted from: Chocolate Moosey
So what am I having? Let's just say that my mom totally loves and adores these two wild and crazy guys....

But she is excited to have a...
 |
| granddaughter! And I am tickled pink! (And guess what - all along I thought it was a boy! I hope I have better instincts as a parent)! |

Wednesday, July 31, 2013
Chocolate Chip Cookie Dough Truffle Ice Cream

Recipe for Chocolate Chip Cookie Dough Truffle Ice Cream
INGREDIENTS:For the cookie dough & cookie dough truffles
1 stick of unsalted butter, softened at room temperature
 3/4 cup of light brown sugar
1 can of sweetened condensed milk
2 1/4 cup of all-purpose flour
1 1/2 tsp. of pure vanilla extract
1 1/4 cup of mini chocolate chips
2 ounces of semisweet or bittersweet chocolate, chopped
For the ice cream mixture
3/4 cup of whole milk, well-chilled
1/2 cup of granulated sugar
1 vanilla bean pod, split lengthwise and beans scraped out
1 tsp. of pure vanilla extract
A pinch of salt
1 1/2 cups of heavy whipping cream, well-chilled
DIRECTIONS:
For the cookie dough & cookie dough truffles
Put the softened butter and brown sugar into a large bowl. Use an electric hand mixer set on medium low speed to mix the butter and sugar together until it is smooth, about 3 minutes. Add in the condensed milk, vanilla extract, and flour. Mix again with the hand mixer set on low for about 30 seconds or until well incorporated. Pour the chocolate chips into the mixture and use a spoon to fold in. Cover the bowl and put it into the refrigerator for about an hour. Make about 50 - 60 tiny (about 1/4 - 1/2 tsp.) cookie dough balls out of the batter and place on a foil-lined container(s). Cover the container(s) and put in the freezer for 1 - 2 hours. When you dip the cookie dough, you will only be dipping HALF of them. The ice cream has some chocolate coated cookie dough and some regular cookie dough balls.
Prepare a double boiler and set the bottom part with the water over medium to medium high heat. Then place the chopped chocolate into the top part of the boiler and fit it on top once the water begins to steam. Stir constantly until the chocolate is melted and smooth. Turn off heat. Use a spoon to dip the cookie dough balls in the chocolate and coat (place several cookie dough balls into the chocolate at one time - I did about 5 at a time). Place the coated balls onto a foil lined dish or baking sheet and then put in the fridge to harden. Put the cookie dough balls that you did not dip back into the freezer until ready to use. You will have a ton of cookie dough batter leftover! You can make a bunch of cookie dough truffles as a gift for someone or just for yourself to indulge in.
For the ice cream mixture
Put the whole milk and sugar into a largish bowl. Mix with an electric hand mixer on low speed for 1 - 2 minutes. Place the vanilla beans into a very small bowl and pour the vanilla extract over. Mix gently with a spoon. Add it to the milk mixture and then add the salt. Stir to incorporate. Pour in the heavy whipping cream and mix with the electric hand mixer set on low speed for about 20 - 30 seconds. Cover the bowl and put it into the fridge for about 30 - 45 minutes.
For the ice cream
Pour the chilled vanilla ice cream mixture into an automatic ice cream maker. Make according to manufacturer directions. After ice cream has been mixing for half the amount of time until finished, with the ice cream maker still running, drop in the cookie dough balls and the cookie dough truffles into the ice cream maker. Once the ice cream is finished mixing (according to the amount of time on manufacturer directions), spoon it into a container, cover, and place into the freezer. Let freeze for about 30 minutes & serve! Sprinkle some extra mini chocolate chips on top, if desired.
Recipe serves about 6 (possibly less, possibly more, depending on serving size)!
Other Ice Cream Recipes Shared this Month: Dreamy & Creamy Chocolate Ice Cream, Creme Fraiche Ice Cream with Peaches and Blueberries, Roasted Cherry and Vanilla Ice Cream Pie
Beth's Favorite Ice Cream Recipes: Chocolate Mint Ice Cream with Cacao Nibs, Basic Vanilla Ice Cream

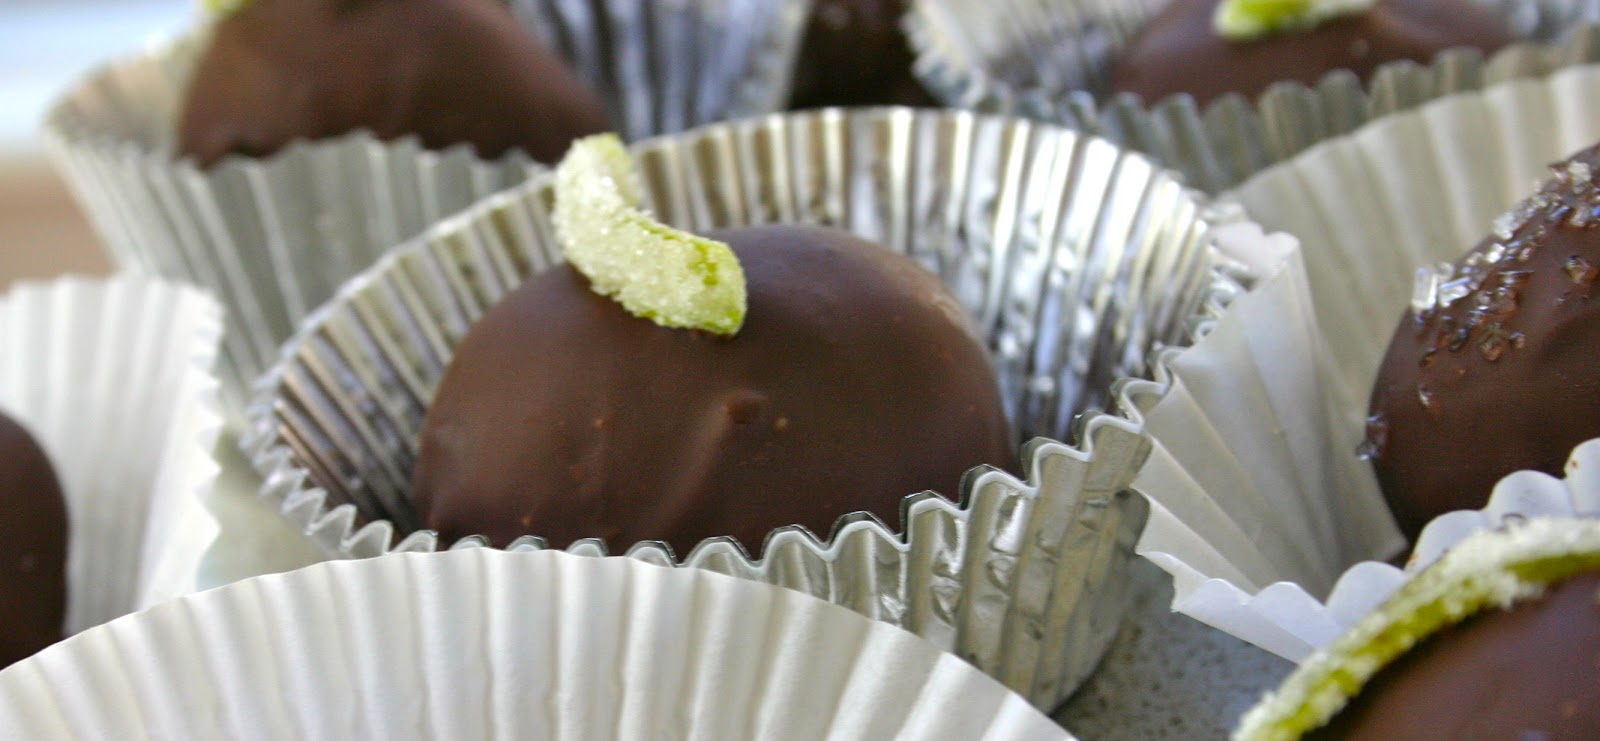
Saturday, May 4, 2013
Dark Chocolate Lime Truffles with Candied Lime Peel

Recipe for Dark Chocolate Lime Truffles with Candied Lime Peel
For the truffle filling
3/4 cup plus 2 Tbsp. of heavy whipping cream
9.7 - 10 ounces of bittersweet chocolate (70% cocoa)
2 Tbsp. of freshly squeezed lime juice
Cocoa powder, to help with rolling
For the truffle coating
9.7 - 10 ounces of bittersweet chocolate (70% cocoa)
For topping
2 medium limes
2 Tbsp. of water
1/2 cup granulated sugar, divided
Decorative sugar (optional)
To make the candied lime peel, use a vegetable peeler to grate strips of the lime peel. Use a knife to cut the grated peels into 3/4-inch long and 1/4-inch thick pieces. Place the water and 1/4 cup of the sugar into a small saucepan and set over medium-high heat. Bring to a boil, stirring almost constantly, until the sugar is fully dissolved. Add in the lime peel, put heat on low, and cover. Allow to cook for 3 minutes. Remove from heat, uncover, and allow to cool completely. After cooling, drain through a fine mesh sieve/strainer. Separate the lime peels and place onto a large plate lined with parchment paper and let dry. Once dried, put lime peels into a bowl and add in the remaining 1/4 cup of sugar. Toss until the lime peels are coated with the sugar. Set aside until ready to use for topping truffles. You will probably have more candied lime peel than you will need - pick out the prettiest ones to top the truffles with & save the rest for nibbling!
For the truffle filling
Finely chop the chocolate by breaking it into squares and placing in the bowl of a food processor fitted with a metal blade. Pulse until the chocolate is finely chopped. Leave chocolate in food processor bowl until ready to use.
Put the heavy whipping cream and lime zest in a medium-sized saucepan and set over medium heat. Cook until the cream just comes to a simmer, then remove from heat and immediately pour in the finely chopped chocolate. Cover the saucepan and let it sit for 5 minutes. After 5 minutes, stir the cream and chocolate together very gently until the mixture is smooth. Add in the lime juice and stir until just combined. Pour the mixture into a bowl and cover tightly with a lid or with plastic wrap. Put in the fridge for several hours, preferably overnight.
Line the bottom of freezer-safe containers with foil or parchment paper. Take the chocolate lime mixture out of the fridge. Dust your hands with cocoa powder, have ample supply of paper towels nearby (because your hands will get messy), and use a cookie dough scoop to scoop up the mixture. Use your hands to roll each scoop into a 3/4-inch ball, then place in a single layer in the prepared containers. Cover the containers with a lid and place in the freezer for at least 2 hours.
For the truffle coating
Line a baking sheet with parchment paper. Prepare the bottom pan of a double boiler by adding water. Use a sharp knife and cutting board to cut the dipping chocolate into smallish pieces. Place the chocolate in the double boiler saucepan. Place the bottom pan of the double boiler over medium heat, and when the water begins to simmer and steam rises, place the saucepan with the chocolate on top of the boiler. Stir the chocolate frequently until is is completely melted and smooth. Turn off the heat. Take the balls out of the freezer. Drop one or two at a time into the chocolate mixture, and use a spoon to coat completely with the chocolate. Gently drop on the prepared baking sheet and top with a candied lime peel. Sprinkle with a little bit of decorative sugar, if desired. Continue this process, working quickly, until all of the truffles are dipped and topped. Place the pan into the fridge and allow the chocolate to harden. They should be ready to eat after about 20 minutes. Store in an airtight container in the fridge. Enjoy!
Recipe makes 25 - 30 truffles.


Saturday, November 17, 2012
Chocolate Marshmallow MADNESS!

This recipe was inspired by the frosting on the ice cream cone cupcakes. I tried making these once before, but the butter did not work too well in the recipe. So I omitted the butter this time, added some mini chocolate chips to the mix, and it was a success. My coworkers approved, Greg approved, and I hope you will also approve of the madness! Make sure to enjoy the chocolate marshmallow madness with a glass of milk.
Recipe for Chocolate Marshmallow MADNESS!
INGREDIENTS:For the inside:
2 7-ounce jars of marshmallow creme
1 1/4 cups of chocolate chips (regular sized)
1/4 cup of cocoa powder
1/2 tsp. of vanilla extract
1 - 1 1/2 cups of mini chocolate chips (depending on your desired amount of chunkiness)
For the coating:
16-ounces of semisweet baking chocolate squares, broken in half
DIRECTIONS:
For the inside:
Melt the 1 1/4 cups of regular-sized chocolate chips in a smallish saucepan set over medium-low heat, stirring occasionally. Remove the chocolate from heat once it is melted and smooth. Set aside to cool slightly.
Put the marshmallow creme, cocoa powder, and vanilla extract into a large mixing bowl. Add in the slightly cooled melted chocolate and the mini chocolate chips. Using an electric hand mixer set on medium-low speed, beat the mixture together for a couple minutes until it is smooth and all ingredients are well incorporated. Stir in more mini chocolate chips, if desired. Cover the bowl with a lid and put it in the fridge for several hours, preferably overnight.
After mixture has been refrigerated, line a couple freezer-safe containers with parchment paper. Take the mixture out of the fridge and use a cookie dough scoop to form the marshmallow filling. Scoop a little out and roll into 1-inch (or larger) balls. Place each one onto the parchment lined containers. Cover the containers with foil and place in the freezer for a few hours (or more).
For the coating:
Line a baking sheet with parchment paper.
Place the broken squares of baking chocolate into a medium-sized saucepan. Prepare a double boiler with about 1/2 cup of water, and set the double boiler over medium heat. Once steam starts to come up through the boiler, set the saucepan of chocolate on top. Allow the chocolate to melt, stirring frequently. Once the chocolate melts, turn off the heat. Take the chilled chocolate marshmallows out of the freezer. Drop each one into the melted chocolate one at a time and use a spoon to coat. Use the spoon to carefully place each one onto the prepared baking pan. Once you have coated each one, place baking sheet into the refrigerator. Allow the chocolate to harden. Once the chocolate has hardened, they are ready to eat. I found that they actually taste best at room temperature, so you can take them out of the fridge to sit until they are ready to be served.

Subscribe to:
Comments (Atom)