Translate

Showing posts with label sweets. Show all posts

Sunday, April 24, 2016

Avocado Ice Cream with Homemade Chocolate Syrup

I have been obsessed with avocados lately. Actually, I have been obsessed with avocados for quite a long time, but these days, I feel like I am eating them at least once a day. I will eat it an avocado for breakfast with eggs, eat avocados for dinner with Mexican meals, and I will even eat avocados for dessert! I dreamed up this ice cream one night before going to bed, and the next day, I made my dreams come true. Wendy helped me make the ice cream mixture. Wendy put the milk, sugar, and lemon juice into the blender, and I added in the avocado. Then Wendy ran away to another room when I turned the blender on, and then came back into the kitchen when it was time to mix in the cream. We then added chocolate sauce and some milk into the mixture that we couldn't get out of the blender, and shared a chocolate avocado shake (well, Wendy let me have two sips). Based on the smoothness of the shake and the flavor, I could tell that the ice cream was going to be a hit. I only made a small amount of ice cream in case it didn't turn out, but next time I will make the full recipe. We all loved this ice cream!


Recipe for Avocado Ice Cream with Homemade Chocolate Syrup

INGREDIENTS:
1/2 cup of organic cane sugar
1 1/4 cup of whole milk
3 small to medium sized ripe (but not overripe) avocados, pit and skin removed
2 tsp. of freshly squeezed lemon juice
1 1/4 cup of heavy whipping cream

DIRECTIONS:
Put the sugar, milk,  avocado, and lemon juice into a blender. Mix until smooth. Pour into a large bowl. Stir in the heavy cream and whisk until well combined. Cover the bowl and place in the refrigerator for 3 - 4 hours. Then pour mixture into an automatic ice cream maker. Start ice cream maker, and let it mix for about 5 - 7 minutes, or until ice cream is formed. It will take less time than regular ice cream mixtures due to the thickness of the avocado. Then transfer ice cream into a freezer safe container and freeze for desired amount of time before serving.Serve ice cream with homemade chocolate syrup!

For the chocolate syrup:
INGREDIENTS:
1/2 cup sugar
2 1/2 Tbsp. of cocoa powder
1/8 tsp. salt
2 Tbsp. of unsalted butter
2 Tbsp. water
1/4 tsp. pure vanilla extract

DIRECTIONS:
Put the sugar, cocoa powder, and salt into a small saucepan. Add the 2 Tbsp. of water, more if needed, so mixture is able to be stirred. Add the unsalted butter. Put the saucepan over medium high heat, stirring constantly, until it comes to a boil.  Let the mixture boil for 1 minute, then remove from heat and immediately stir in the vanilla extract. Serve warm or at room temperature over ice cream. Store any leftovers in an airtight container in the fridge for up to 5 days.

Monday, January 25, 2016

Baked Hot Chocolate

What do you do when there is close to 3-feet of snow on the ground and you really do not feel like doing much at all? If you are anything at all like me, you do things like catch up on reading, dance and color with your toddler, think about getting dressed in something other than sweats (but never do), bake, and eat lots of food. I finished up the container of hot chocolate that I made on Friday, and instead of making some more (especially since we are a bit low on milk), I made this amazing baked hot chocolate instead. It is made with rich semisweet chocolate, butter, eggs, and sugar - that's it. Since Greg is not feeling too well he decided not to have one of the two mugs of this deliciousness that I made, so I got to eat both over the past 24 hours. I did share a little with Wendy, and she was pretty crazy about it, as she yelled "more, more" after every bite I gave her. I am pretty sure you will also love baked hot chocolate. It has a thin layer of crunchy, a middle layer of smooth, and you will not stop eating it until you reach the bottom. It is kind of like a cross between a chocolate lava cake, chocolate pudding, and hot chocolate! I found out that tomorrow is another snow day for me, so more baked hot chocolate making and eating is at the top of my to do list! I might even put on some jeans, too. Enjoy!


Recipe for Baked Hot Chocolate

INGREDIENTS: 
5 ounces of semisweet baking chocolate, finely chopped (I used SCHARRFEN BERGER 62% baking bar)
3 1/2 Tbsp. of unsalted butter, cut into small cubes
SNOW DAY + BAKED HOT CHOCOLATE = HAPPINESS
2 large eggs, at room temperature
2 Tbsp. of pure cane sugar (or granulated)
A pinch of cinnamon (optional)

DIRECTIONS:
Position the oven rack to the middle and preheat oven to 350 degrees. Put two 8-ounce oven-proof mugs or ramekins into a baking pan or roasting pan.

Put an inch of water in the bottom pan of a double boiler and set over medium high heat. Bring to a gentle simmer. Put the chopped chocolate and butter in the top pan of the double boiler and set over the simmering water, stirring until fully melted and smooth. Set aside. Leave the bottom pan with the water on the stovetop and continue to let it simmer.

Put the eggs, sugar, and cinnamon in a small saucepan and whisk together with a fork. Then use the handle of the saucepan to hold it over the simmering water for a few minutes or until warm, almost hot to the touch(I just literally held it over the steam from the water - it's a good workout...). Then use a hand mixer set on medium-high speed to beat the egg and sugar mixture until light and fluffy, about 3 - 4 minutes. Carefully pour the egg mixture into the chocolate mixture, making sure that there is no water from condensation on the bottom of the pan that drips in (I used a towel to wipe the bottom of the pan before I added to chocolate mixture). Use a spoon to gently fold the eggs and chocolate together until smooth and you don't see any streaks. Pour or ladle into the mugs or ramekins. Pour very hot water into the baking dish, being careful not to let water splash into the mugs, until it reaches about halfway up the sides of the mugs. VERY carefully transfer the pan to the oven. Cook for 15 - 20 minutes, or until the tops are no longer shiny. Remove from oven, use a hot pad holder to remove the mugs out of the water, and place mugs on a cooling rack for a few minutes before serving. I topped mine with plain cream and some chocolate chips. I am sure it would be amazing with some fresh whipped cream too!

Baked hot chocolate is best enjoyed hot (in my professional opinion), but it can be also eaten at room temperature. You can cover well with foil and store in the fridge for up to one day. To reheat, first let it come to room temperature and then bake at 350 for 5 - 8 minutes.

Recipe Adapted from: The Essence of Chocolate Recipes for Baking and Cooking with Fine Chocolate
Recipe serves 2. 
A shot of our home in the snow!

Friday, December 4, 2015

Outrageous Brownie Truffles

Please visit my new blog, Make It and Bake It with Beth, for the brownie truffles recipe.

Monday, July 20, 2015

Healthy AND Delicious Fudge - no butter or refined sugar!

For some reason I always seem to crave healthier foods during the summer months. I would say that I eat best in the month of July out of all the other months in the year. I am far from being vegan (I absolutely LOVE all things dairy), but when it comes to sweet treats, I always seem to want to try out vegan or healthier desserts during the summer months.

This vegan fudge has an amazingly smooth texture from the coconut oil, and the cashew butter and cacao powder give it an incredibly rich taste. It is sweetened with some pure maple syrup, which is much better than refined sugar. You can't tell at all that this fudge is not made with the typical ingredients of butter and refined sugar. The one thing you do have to remember about vegan desserts (and this vegan fudge) is that even though they are healthier, they are still loaded with calories. However, they are not "empty" calories, since cashews have tons of health benefits, natural cocoa powder is high in fiber, and maple syrup has awesome things in it like calcium, iron, potassium, zinc, and manganese. One piece has approximately 75 calories, and it is easy to snack on it all day long, so be careful with it! I was told by a few people that if I had not told them what it was made with, that they would have never guessed the ingredients. So if you do make it, make sure to tell people what it has in it in case someone has a nut allergy! I hope you enjoy this fudge as much as I do.

Recipe for Healthy AND Delicious Fudge - no butter or refined sugar!

INGREDIENTS:
2 1/4 cups of raw cashews*
1/3 cup plus 1 tsp. of coconut oil, divided (at room temperature)
2 tsp. of pure vanilla extract, divided
1/2 tsp. of coarse sea salt, divided
1/4 cup of cacao powder (I use Viva Labs cacao powder)
1/4 cup of pure maple syrup

*If you want, you can use 1 cup of store-bought cashew butter in this recipe. I recommend making your own cashew butter, though. If you use store-bought cashew butter, omit the cashews, 1 tsp. of coconut oil, 1 tsp. of vanilla extract, and 1/4 tsp. of sea salt from the recipe. 

DIRECTIONS:
Make the cashew butter first. Put the 2 1/4 cups of cashews, 1 tsp. of coconut oil, 1 tsp. of pure vanilla extract, and 1/4 tsp. of sea salt into the bowl of a food processor. Start the food processor and allow it to run. It will take several minutes (about 8 to 10 minutes) for the mixture to turn to a cashew butter. You will want to stop the food processor every minute to two to give the processor a break and to scrape the sides, if needed. Add more coconut oil to the mixture as you see desired. When the mixture turns into the cashew butter (it will be thick), remove it from the processor and scoop into a medium-sized bowl. Note: This is a recipe for the cashew butter that is used in this fudge.  If you want smoother cashew butter to use for spreading, you will want to run the processor for much longer and might want to check out other recipes for homemade cashew butter, like the one from The Healthy Foodie.

Add the remaining 1/3 cup of coconut oil to the cashew butter and use an electric hand mixer set on medium-low speed to mix until well combined. Then add in the remaining 1 tsp. of vanilla extract, 1/4 tsp. of sea salt, cocoa powder, and maple syrup. Use the electric hand mixer to mix until the mixture is smooth. Line a freezer-safe container (I used a square SnapLock container - 6" x 6") with parchment paper. Use a spoon or spatula to spread the mixture onto the parchment paper in an even layer. Then cover the container and place in the freezer for at least an hour before cutting into it.  Remove from the freezer and chop into desired sized squares. Store the fudge in the freezer and eat fairly soon after removing it from the freezer, because it becomes soft quickly from the coconut oil.

Recipe Makes Approximately 30 pieces of fudge, depending on how you cut it. Approximately 75 calories per piece (if you cut into 30 pieces)! Store in the freezer.

Recipe Adapted from: The Detoxinista, Originally from Raw Food, Real World

Monday, April 13, 2015

The Best Banana Pudding

My little girl turned 1-year old last Tuesday! This past year just flew right by, and a lot of it is kind of a blur to me. Wendy is a total sweetie, and she brings such joy into our lives. We celebrated her birthday on Easter with family. Greg made North Carolina-style barbecue, and I made coleslaw, hush puppies, and this banana pudding for dessert. It was quite fun experimenting with deep frying hush puppies, and they were delicious, but my favorite part of the meal was definitely the banana pudding. Greg's father, who has had a lot of banana pudding in his lifetime, said it was the best banana pudding he has ever had. Wendy has been eating bananas since she started eating solid foods, and she went crazy over the banana pudding. I couldn't resist posting a picture of her eating the banana pudding. We had decided to do the pudding in place of cake for her celebration, but on her actual birthday, we let her have a chocolate cupcake. She loved that too and definitely has my chocolate-loving gene! If you are looking for an easy dessert to make for a big crowd, this banana pudding is perfect. Enjoy!

Recipe for The Best Banana Pudding

INGREDIENTS:
1 14-ounce can of sweetened condensed milk
1 1/2 cups of ice cold water
1 package of Jello Brand instant vanilla pudding mix (3.4 ounce)
3 cups of heavy cream
1 1/2 - 2 boxes of Nabisco Nilla Wafer cookies
4 cups of sliced ripe bananas, cut into 1/4-inch slices

DIRECTIONS:
Put the sweetened condensed milk and ice cold water into a small bowl. Use an electric hand mixer set on medium speed to mix until they are well combined, about 1 minute. Then add the instant pudding mix into the bowl and beat for about 2 minutes, or until well incorporated. Cover the bowl and put into the fridge for at least 4 hours.

Put the heavy cream into a large bowl and use the electric hand mixer set on medium speed to beat until stiff peaks form. Then gently fold in the pudding mix and blend until you no longer see any streaks of the pudding mix.

Assemble the banana pudding. In a large and wide glass bowl, arrange the wafers on the bottom and then add one-third of the banana slices on top of the wafers. Cover with 1/3 of the pudding mixture. Then repeat with the wafers, bananas, and pudding two more times, finishing with a layer of pudding on top. Garnish the top layer of pudding with wafers and banana slices. Cover the bowl tightly with plastic wrap and put in the fridge for at least 4 hours, but no more than 8 hours, before serving.

 *This recipe requires a lot of time to set, so make sure you start it well in advance to when you want to serve it. I started it at 9 AM in order to serve it for dessert by 6:00 PM.

She loved celebrating her first birthday, and she was crazy about the banana pudding!
Recipe from: Eclectic Touch, originally from Magnolia's Bakery Cookbook

Tuesday, March 24, 2015

One Dozen Brownie Cookies

My friend posted the link to this recipe on Facebook the other day, with the caption "making these tonight." However, when I followed up with her several days later, she still hadn't made them! I decided that I needed to try the recipe for myself. Greg was out shooting an event, and Wendy was down for a nap, and I got the urge to bake! I knew I didn't need 3 dozen cookies though, so I decided to cut the recipe into a third to make only a dozen cookies. It probably is a good thing that I didn't make the 3 dozen, because the cookies I did make went really, really fast between me and Greg. When I first took the cookies out of the oven, a little piece broke off and I took a bite. I wasn't impressed, and I let my friend on Facebook know. But then after they cooled completely, I dusted them with the powdered sugar, took another bite, and had to eat my words (and the rest of that cookie). The texture of these brownie cookies are soft and chewy and crunchy and gooey all at the same time. They have just the right amount of chocolate in them and just the right amount of sweet. I suggest you make these cookies as soon as you can. Enjoy!

Recipe for One Dozen Brownie Cookies

INGREDIENTS:

1 ounce of bittersweet baking chocolate (I used Ghirardelli)
5 1/2 Tbsp. of unsalted butter, softened at room temperature
1/2 cup plus 2 Tbsp. of sugar
1 tsp. of pure vanilla extract
1 large egg
3/4 cup of all-purpose flour
1 Tbsp. plus 1 1/2 tsp. of cocoa powder
3/8 tsp. of baking powder (use a 1/8 tsp. to measure each, scantily filled)
1/8 tsp. of salt
Powdered sugar, for dusting

DIRECTIONS:
Preheat the oven to 350 degrees. Generously grease a baking sheet with a pat of butter.

Put the baking chocolate into a microwave safe bowl and heat on high in the microwave for about 45 seconds. Remove the chocolate from the microwave and stir. If not fully melted, heat for another 10 - 20 seconds. Once melted, set aside to cool.

Put the softened butter and sugar into a large mixing bowl. Use an electric hand mixer set on medium high speed to mix until well incorporated, about 2 minutes. Then slowly add in the cooled chocolate and mix on low. Then add in the vanilla extract and egg and mix again on low.

Put the flour, cocoa powder, baking powder, and salt into a small bowl and stir. Pour half of the flour mixture into the wet mixture and use the electric hand mixer to beat on low speed until combined. Then add in the rest of it and beat again on low until combined.

Use a one tablespoon cookie dough scoop to scoop up batter and place on prepared baking pan. Bake for 11 minutes. Remove from oven, let the cookies sit on the pan for 2 minutes, and then use a spatula to gently transfer them to a baking rack so they can cool completely. Once cooled, sprinkle with desired amount of powdered sugar.

Recipe makes approximately 1 dozen cookies. They taste best when cooled. Store in an airtight container on the kitchen counter.

Recipe Adapted from: The Pioneer Woman

Saturday, November 29, 2014

Pumpkin Coffee Cupcakes with Whipped Cream and Caramel Sauce

Wow, this was an amazing cupcake! I actually had made these cupcakes a couple years ago around the same time of year for my mother's birthday, but I didn't get around to taking a picture. I can't believe it took me another two years to make them again. They are spectacular.

A few months ago I met a new neighbor who has a daughter that is just two weeks younger than Wendy! I felt so happy to know that Wendy had her friend Cayd, who is a few months younger, and Elyse, on the same street as her! I envisioned many play dates in her (and my) future. The other day Wendy had a play date with Elyse while Angela and I made these cupcakes. Although it is a little difficult to cook with babies in our arms, we were able to make these cupcakes without too many disasters. I did have to remind Angela on the recipe the difference between the tablespoon and teaspoon (she is from Italy and cooks in grams) and fortunately we realized when almost a tablespoon of salt went into the flour mixture!

What I love about these pumpkin coffee cupcakes is that they are incredibly moist. I also love the whipped cream topping and caramel sauce. It is a cupcake that you can seriously eat for breakfast (and I did...twice). It reminds a bit of eating gingerbread with whipped cream and lemon sauce. They are pretty easy to make and I know you will enjoy every single bite! I will definitely not be waiting two years or even one year to make these again. Maybe I will make them next week. Or today. Only time will tell....

Enjoy!

Recipe for Pumpkin Coffee Cupcakes with Whipped Cream and Caramel Sauce 

INGREDIENTS:
2 2/3 cups of all-purpose flour
3 Tbsp. of instant coffee powder
2 tsp. of baking powder
2 tsp. of baking soda
1 tsp. of salt
1 1/4 tsp. of cinnamon
1/8 tsp. of ground cloves
1/8 tsp. of ground nutmeg
15 ounces of canned pumpkin
1 cup of vegetable oil
1 cup of granulated sugar
1 cup of light brown sugar, packed
4 eggs

For topping
4 ounces coffee (to be brushed on when cupcakes are still warm)
2 cups of heavy whipping cream
3 Tbsp. of powdered sugar
*Salted vanilla bean caramel sauce - I halved this recipe and it was plenty. You will need 1/2 cup granulated sugar, 5 ounces of heavy cream, 1/2 vanilla bean, 1/8 tsp. of coarse sea salt, and 1/4 tsp. of vanilla extract (if you also choose to cut the recipe in half)

DIRECTIONS:
Preheat the oven to 350 degrees.

Put the flour, instant coffee powder, baking powder, baking soda, salt, cinnamon, cloves, and nutmeg into a medium bowl and then sift to mix. Put the pumpkin, oil, granulated sugar, and light brown sugar into a large bowl. Use an electric hand mixer set on medium speed to beat. Then add in the eggs, one at a time, and beat after each addition to incorporate. Put the hand mixer on low speed and add in half of the flour mixture. Beat until just incorporated and then add in the rest of the flour mixture and beat again until just incorporated.

Line a cupcake pan or muffin pan with paper cupcake liners. Use a cookie dough scoop to scoop the batter into the liners and fill about 3/4 full. Place the pan in the oven and bake for about 20 minutes. Then transfer the pan to a wire rack to cool for 10 minutes. Remove the cupcakes from the pan and place on top of a paper towel or a pan (to avoid getting coffee all over your countertops). Generously brush the tops of each cupcake with the coffee. Brush one coat of coffee on each cupcake, then brush each one again. Add another coat if desired. Make sure to do this while the cupcakes are still warm! Then allow the cupcakes to cool completely.

While the cupcakes are cooling, make the caramel sauce.

Before making the topping, place a metal bowl and a beater in the freezer for a few minutes. Then make the whipped cream topping. Pour the heavy whipping cream into the cold metal bowl and use an electric hand mixer fitted with the cold beater to beat the cream. First beat the cream on medium low speed and then gradually increase to high speed. When soft peaks begin to appear, blend in the powdered sugar. Then whip until stiff peaks form in the cream mixture and make sure not to over beat it. Use a spoon or spatula to top each cupcake with the whipped cream topping. If you are fancy, you can use a pastry bag with a decorating tip to frost (but I'm not that fancy). Then drizzle with the caramel sauce.

If you aren't serving right away, drizzle caramel sauce on right before serving. These cupcakes are best eaten within a couple days of making them. Store in the refrigerator in an airtight container.

*Comment on the caramel sauce: Be patient. When I was making it, the mixture turned rock-like and I didn't think it would work. As you continue to stir it will liquefy and turn into caramel! It does take a long time for the sugar to caramelize. And, it's okay if the caramel sauce is thin (like mine was). It is still absolutely divine.

Recipe Source: Annie's Eats, cake recipe originally from Williams Sonoma

Saturday, November 15, 2014

Dark Chocolate Ginger Truffles

Please visit my new blog, Make It and Bake It with Beth, for the dark chocolate ginger truffles recipe


Saturday, September 20, 2014

Healthy Peach Cobbler Bites (made with cashews)!

Hi there! Time really flies. I can't believe I have not posted an entry on here in four weeks. I am really slacking these days. I was all set to post a new zucchini brownie recipe (see the old recipe here) a few weeks ago, but then I never got around to downloading the pictures...and now zucchini isn't really in season. I had made another awesome recipe with zucchini (zucchini, corn, and ricotta fritters) over the summer that I wanted to post, but I never got around to doing that either. But next summer I will post them! The thing is, you just don't really have much time when you have a baby in the house. It's the truth. Wendy is super active and loves to play, and she really doesn't want to nap during the day. She fights it hard. But she has a bit of a cold right now and she is actually napping (very sad for her, but I do enjoy the extra time while she is resting), so I am posting! Another thing besides having no time that changes after having a baby is food preferences. I had heard it before but didn't really believe it but it is definitely true for me. This might shock you, as it even shocks me, but I do not crave sugar much at all these days. I definitely still love dark chocolate, but I can totally pass up cookies, cakes, and other baked goods that used to endlessly taunt me. When I am craving sweet, I turn to things like granola or banana cookies. A new sweet and healthy treat recipe I tried last night are these  peach cobbler bites, that are made with cashews, coconut, dates, and peaches! They seriously taste like little pieces of peach cobbler and I love them. Greg is a huge fan too. I got the idea when I came across this recipe on Pinterest (follow me if you'd like at beffy78). At first I wasn't sure because cashews are super pricey, but they have them on sale at The Fresh Market in Annapolis on Saturdays so I bought a bunch. Then I looked for freeze dried strawberries but couldn't find them, and the alternative of using dried strawberries is ridiculously expensive (16.99 for 6 ounces - I don't think so)! So I tried them with dried peaches, and they are amazing. I think you will enjoy them too. They are great for a quick snack on the run. You can also choose not to roll them into balls and use the mixture to sprinkle onto yogurt or add to smoothies. Yum!

Oh, by the way, these are vegan, no-bake AND gluten-free. Score!

Recipe for Healthy Peach Cobbler Bites
INGREDIENTS:
1 cup of raw cashews
1/2 cup of unsweetened coconut flakes
8 - 10 (or about 6 ounces when weighed with pit) Medjool dates, pitted and cut in half
1/2 tsp. of coconut oil
1 tsp. of vanilla extract
A pinch of coarse sea salt
A couple pinches of ground cinnamon (optional)
7 ounces of dried peach rings

DIRECTIONS:
Put the cashews and coconut into the bowl of a food processor fitted with a metal blade. Pulse several times until finely chopped (about 10 - 12 seconds). Add in the dates and pulse until the mixture becomes a bit sticky (about 8 seconds). Add the coconut oil, vanilla extract, salt, and cinnamon. Pulse briefly (1 - 2 seconds). Add in the dried peaches and run the food processor for about 10 seconds or until the peaches are well incorporated. Put the mixture into a bowl, put on an airtight lid, and put into the fridge for a couple hours. Then use a cookie dough scoop to scoop and use your hands to shape into desired sized balls. Store in an airtight container in the fridge.
Recipe makes approximately 30 bites

Recipe Adapted from: Better with Cake 

Sunday, May 11, 2014

Mexican Wedding Cakes

Looking for something to talk about? I'll give you a topic. Mexican Wedding Cakes are not really Mexican nor wedding cakes. Discuss. Yes, if you watched Saturday Night Live back in the early to mid 90s, you might remember the skit "Coffee Talk." The "host" was Mike Meyers playing a woman and he would always say things such as "the Partridge Family were neither Partridges nor a family" during the skit. It was awesome. Back to the Mexican Wedding Cakes. They are cookies and there is nothing really Mexican about them. They actually go by several different names, including Russian Tea Cookies. People might not be able to agree on a name for these cookies, but they can agree on one thing - that these shortbread-like cookies melt in your mouth and that they are like buttah.

I had forgotten about these delicious cookies. My mom used to make them when I was a kid.  I was googling desserts to make for Cinco de Mayo and I came across the recipe. I immediately remembered that they were the cookies my mom used to make. When I bit into my first cookie, I was instantly transported back to my youth. I love feelings of nostalgia! These cookies are super easy to make. I especially liked making them because I felt okay with eating tons of the batter since there are no eggs in the recipe. Score! I hope you like these cookies as much as I do. You can call them whatever you want to! Enjoy.

Recipe for Mexican Wedding Cakes 

INGREDIENTS:
1 cup of walnuts
2 cups + 2 Tbsp. of all-purpose flour, divided
16 Tbsp. of unsalted butter (2 sticks), softened at room temperature
5 Tbsp. of powdered sugar
1 tsp. of pure vanilla extract
1/16 tsp. of pure almond extract
1/4 tsp. of salt
For dusting
1 cup of powdered sugar

DIRECTIONS:
Preheat oven to 350 degrees and spread the walnuts onto a baking sheet. Cook in the oven for 8 - 10 minutes or until lightly toasted. Remove and let them cool a bit before using. Turn off oven.
Put the walnuts and 2 Tbsp. of flour into a food processor fitted with a metal blade. Pulse several times until the walnuts are finely ground. Set aside.

Put the butter and powdered sugar into a large mixing bowl. Beat together on medium speed with an electric hand mixer until well blended. Add in the 2 cups of flour, walnut mixture, vanilla extract, almond extract, and salt and beat again until well incorporated. If the batter seems a little dry, add about 1 - 2 tsp. of milk to it. Cover the bowl with a lid and place in the fridge for at least an hour.

Put the powdered sugar into a bowl and sift. Preheat oven back to 350 degrees. Line 2 baking sheets with parchment paper. Use a cookie dough scoop to scoop dough into 1-inch balls. Place on the lined baking sheets about 2 inches apart. Put in oven and bake for 12 minutes or until lightly browned on the edges. Remove from oven and transfer to a cooling rack. Let cool for at least 5 minutes, no more than 8. Roll each cookie in the powdered sugar and then place back on cooling rack. Once cookies are completely cooled, store cookies in an airtight container.

Makes approximately 36 cookies. 

Recipe Adapted from: Joy of Baking 

Sunday, April 20, 2014

Spicy Ginger "Labor Inducing" Cookies


Recipe for Spicy Ginger "Labor Inducing" Cookies

Please visit my new website, Make It and Bake It with Beth, for the recipe for Spicy Ginger "Labor Inducing" Cookies


Sunday, April 6, 2014

Pineapple Upside Down Cupcakes

So, I was due to have my baby on March 28th. And guess what? I'm still pregnant! Someone suggested that maybe I have been feeding baby Wendy too well, and I guess that is a possibility - I mean, she'll have to go from eating yummy things like pineapple upside down cupcakes and chocolate to MILK. No fun. I took my maternity leave over a week ago, thinking that I'd be having baby soon. The relaxing has been nice, but there are several days where I've thought "today is going to be the day," and then nothing happens. One friend from work emailed me a recipe for pineapple upside down mini cakes (or cupcakes) and I decided to bake them a few days ago. Distractions, such as baking, have been great! Pineapple is also known to induce labor. Well, it didn't happen...but the cupcakes were REALLY good. Greg, my non-sweets loving husband, ate at least half of them - my parents and I split the rest. Well tonight I'm supposed to go in for my induction (well actually tomorrow, but it's at 12:45 AM tomorrow so basically tonight)! I'm hoping I can still go into labor naturally, so I cooked some "labor inducing" cookies earlier.

Anyways, I loved these cupcakes because they were easy to make and less filling than a big huge piece of cake. I will definitely be making them again. Enjoy!

Recipe for Pineapple Upside Down Cupcakes

INGREDIENTS:
2/3 cup of all-purpose flour
1 tsp. baking powder
1/4 tsp. salt
2 eggs
2/3 cup granulated sugar
4 Tbsp. of pineapple juice (from the canned pineapple)
4 Tbsp. of unsalted butter
2/3 cup of light brown sugar, packed
1 can of pineapple rings
Maraschino cherries

DIRECTIONS:
Preheat the oven to 350 degrees. Butter the bottoms and sides of a muffin tin.

In a small mixing bowl, sift together the flour, baking powder and salt. In a largish mixing bowl, use an electric hand mixer set on medium-low speed to beat together the eggs, sugar, and pineapple juice. Then add the flour mixture to the egg mixture and beat on medium speed for 1 - 2 minutes. Set aside.

Melt the butter over medium-low heat in a small saucepan. Once it is melted, adjust heat to low, add in the brown sugar and stir for about a minute.

Put a spoonful of the brown sugar mixture into the bottom of each muffin tin. Put a pineapple ring on top (you might have to cut a piece out of the pineapple ring to make it fit). Then place a maraschino cherry in the middle of the pineapple ring. Top each one with the batter, filling a little over 3/4 full.

Put in the oven and bake for 22 - 25 minutes. You might want to put a baking sheet underneath the muffin tin to prevent anything from spilling into the oven. Remove from oven and let cool for a few minutes. Then carefully loosen each one with the edge of a knife and then flip onto a baking sheet, reassemble any if necessary, and place on a cooling rack to cool.

Recipe makes about 10 cupcakes.

Recipe adapted from: Big Mama's Home Kitchen 


Wednesday, March 12, 2014

M&M Cookies - Rainbow Colors and Shamrocks for St. Patrick's Day!

Mmm, the texture of these cookies is so good! I made M&M Cookies on Sunday while my parents and Greg slaved away on the house. I added in some mini chocolate chips too to make them extra chocolatey. They were quite the hit, and Greg didn't even complain that they were too sweet, like he did with the salted caramel brownies. Last night we had a couple friends for dinner. I made easy chicken risotto with caramelized onions, parmesan bread, and served these cookies for dessert. Needless to say,  once there were 30 cookies, and now there are none. It was my first time making M&M cookies and it definitely won't be the last.

I think these M&M cookies are a great idea for St. Patrick's Day. The M&Ms make a fun rainbow color and you can sprinkle on some green sprinkles or shamrock sprinkles on top if you are feeling extra festive. Enjoy!

Recipe for M&M Cookies (Makes about 2 1/2 dozen cookies) 

INGREDIENTS:
2 sticks (8 Tbsp.) of unsalted butter, softened at room temperature
3/4 cup of light brown sugar, packed
1/4 cup plus 1 Tbsp. of granulated sugar
1 egg
1 1/2 tsp. of pure vanilla extract
M&M Cookies with Festive Shamrocks - a fun treat for St. Patrick's Day
2 cups of all-purpose flour
1/2 tsp. of baking soda
1/2 tsp. of salt
2 tsp. of cornstarch
3/4 cup of M&M's (for the batter)
1/2 cup of mini semisweet chocolate chips
2 Tbsp. of heavy cream
Festive sprinkles (optional)
1/4 cup of M&M's (for topping when cookies are hot)

DIRECTIONS: 
Put the butter into a large mixing bowl and beat on medium speed with an electric hand mixer until smooth, about 30 seconds. Then add in the light brown sugar and mix on medium high speed until the sugar is well incorporated. Pour in the granulated sugar and mix on medium high speed for 1 - 2 minutes, or until the mixture is light and fluffy. Stir in the egg and pure vanilla extract and mix well.

In a medium bowl, sift together the flour, baking soda, salt, and cornstarch. Then pour the flour mixture into the butter mixture and mix on low speed until just incorporated. Fold in the M&M's and chocolate chips.  Cover the bowl with a lid or plastic wrap and put in the fridge for 1 hour. Take out of fridge and stir in the heavy cream which will help the dough to gather up better - use even more than the 2 Tbsp. if needed (you can also use milk).

Preheat the oven to 350 degrees. Line a baking sheet with parchment paper. Scoop the dough up with a 1 1/2 Tbsp. cookie dough scoop and place on the baking sheet, leaving about an inch between each scoop. If using the sprinkles, sprinkle them on or gently press down some sprinkles onto the balls of dough. Put baking sheet in the oven and bake for about 10 minutes. Remove from oven and gently press down a few more M&M's onto each cookie while they are still hot. Allow to cool on baking sheet for about 5 minutes and then transfer to a cooling rack to cool completely. Store in an airtight container for about one week (but they probably won't last that long).

Recipe Adapted from: Crunchy Creamy Sweet

Thursday, February 20, 2014

Granola Chocolate Chip Cookies

These cookies were inspired after making a batch of homemade granola. I was craving cookies (and baking), and I wanted to make something that was filled with ingredients that are also somewhat healthy. In the granola I had made, I used natural coconut, dried cranberries, raisins, and rolled oats. I thought that those ingredients would taste great in a chocolate chip cookie - and I was right! I enjoyed eating some for lunch a couple days this week, but I left them at home while Greg and my parents were working on the renovations, and they sure went quickly. That's okay though because that just means that I should go ahead and make another couple dozen...right? Enjoy!

Recipe for Granola Chocolate Chip Cookies 

INGREDIENTS:
3/4 cup of all-purpose flour
1/2 tsp. of baking soda
1/4 tsp. of salt
3/4 tsp. of ground cinnamon
1 stick of unsalted butter (8 Tbsp.), softened at room temperature
2/3 cup of light brown sugar, packed
3/4 tsp. of pure vanilla extract
1 large egg
1 cup of rolled oats, such as Quaker old-fashioned Oats
1/3 cup of raisins
1/3 cup of dried cranberries
1/3 cup of unsweetened flaked coconut
1 cup of better quality milk chocolate chips, such as Ghirardelli 

DIRECTIONS:
In a medium bowl, sift together the flour, baking soda, salt, and cinnamon. In a large bowl, beat the softened butter with an electric hand mixer set on medium high speed for about 45 seconds. Then add in the brown sugar and continue to beat on medium high speed until fully incorporated and smooth. Add in the vanilla extract and egg and mix well. Pour the flour mixture into the butter mixture and mix on low speed until well combined. Fold in the rolled oats, raisins, dried cranberries, coconut, and chocolate chips. Cover the bowl with a lid or saran wrap and put in the refrigerator for a couple hours.

Preheat the oven to 350 degrees and line 2 baking sheets with parchment paper.  Use a cookie dough scoop or spoon to make desired size balls and place onto baking sheets, with about 1-inch space between the dough. Put one baking sheet in the oven and bake for 12 - 13 minutes. Remove from oven and let cookies sit for about 5 minutes, then transfer to a wire rack to cool completely. Place other baking sheet in the oven and bake, remove, and cool. Store cookies in an airtight container at room temperature.

Recipe makes approximately 2 dozen cookies. 

Recipe adapted from: Crunchy Creamy Sweet

Friday, June 28, 2013

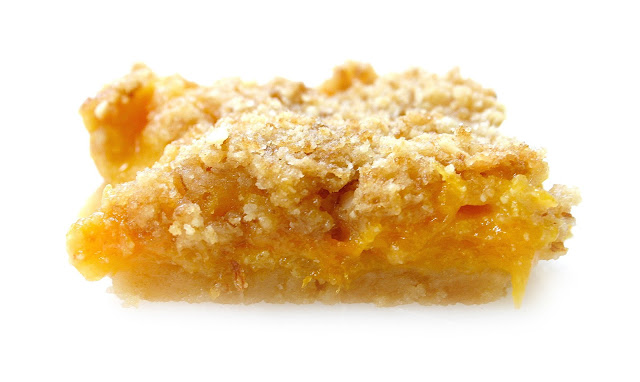
Fresh Apricot Pie Bars


Greg and I are moving up in this world. We said goodbye to Sam's Club in mid-June, and we became members of Costco this past Tuesday evening. We went up to meet my parents at the Costco in Columbia so we could return three portable AC units that we bought 2 years ago. They really did not do a good job at cooling our house, and we didn't feel good about selling them on craigslist, especially since we didn't believe in the product. So Costco has this CRAZY return policy, where if you are not happy with an item, they will take it back and give you a full refund, even if you've had the product for several years. They have some limits on their policy, like for electronics and cell phones, but almost everything else is always returnable. So, yeah, my parents did feel bad about the fact that they were returning items that they bought for us on their membership, so we were politely encouraged by to get our own Costco membership!

Costco is a wonderful place. They have so many great things at such good prices. They even have a pretty nice produce section. On Tuesday, I walked around Costco with my mom and we saw a box of apricots in the produce section, and we decided to split the container. On Wednesday, I was home trying to work on housework and school work, and boredom set in and the urge to bake came over me. The apricots kept calling my name...they were asking me to put them into a delicious baked good treat. I was thinking about these yummy strawberry rhubarb pie bars that a coworker shared at work at the end of the school year, and I wanted to create something like that, but with the apricots. I searched the web and really could not find many pie bar recipes that uses fresh apricots, so I was a bit concerned that my concoction wouldn't turn out. But guess what? It did turn out and it turned out very well. You'll love the way the crust, apricot filling, and sweet and crumbly topping come together. I shared these fresh apricot pie bars at a party on Wednesday evening, and they definitely were a crowd-pleaser. I can't wait to make this yummy treat again. Enjoy!

Recipe for Fresh Apricot Pie Bars 

INGREDIENTS:
For the crust
1 1/2 cups of all-purpose flour
3/4 cup of granulated sugar
A pinch of salt
1/4 tsp. of lemon zest
12 Tbsp. of very cold butter, chopped into small cubes (I put butter in freezer for about 20 minutes before using)
For the apricot filling
8 fresh apricots, pitted and chopped into small pieces
1/2 cup plus 2 Tbsp. of granulated sugar, divided
1/8 tsp. of fresh lemon juice
1 Tbsp. of cornstarch
1 Tbsp. of honey
1/4 cup of part-skim Ricotta cheese
2 egg yolks
For the topping
Reserved crust mixture
1/3 cup of dark brown sugar
1/3 cup of raw almonds

DIRECTIONS:
Preheat the oven to 350 degrees. Butter a 9 x 9 pan. Make the crust. Put the flour, sugar, salt, and lemon zest into the bowl of a food processor fitted with a metal blad. Pulse briefly to blend. Scatter the very cold pieces of butter over the flour mixture. Pulse until the butter is incorporated and the mixture turns to crumbs. Use your hands to gather up some of the mixture, and then put it into the prepared pan. Press down so it sticks to the bottom of the pan, and continue adding more of the mixture until there is an even layer pressed onto the bottom of the pan. You will have leftover flour mixture in the food processor, and it will be used for the topping. Leave it in the bowl of the food processor. Put the pan in the oven and bake for 15 minutes. Then remove from oven, transfer to a wire rack, and allow it to cool.

While the crust is baking, prepare the apricots. Put the chopped apricots into a bowl and gently toss with the 2 Tbsp. of sugar and the lemon juice. Let sit for 10 minutes. Mix the 1/2 cup sugar and cornstarch together in a small bowl. Then put the apricots into a medium saucepan and heat over medium heat. Cook, stirring frequently, for about 5 minutes. Then stir in the cornstarch and sugar and cook for another 1 - 2 minutes. Set aside to cool. Once the apricots have cooled for several minutes, add in the honey, ricotta, and egg yolks. Mix until well incorporated.

Make the topping. Add the dark brown sugar and almonds into the bowl of the food processor with the reserved crust mixture. Pulse until incorporated and the almonds are finely chopped.

Pour the apricot filling on top of the cooled crust. Distribute the topping evenly over the apricot layer. Put pan into the oven and bake for 50 minutes to 1 hour, and rotate the pan halfway between baking. Put on a wire rack to cool before cutting and serving. Makes 16 - 20 bars. Serve fresh apricot pie bars with vanilla ice cream, if desired.
Pie crust recipe adapted from: Annie's Eats, originally from Pink Parsley 

Wednesday, June 26, 2013

Banana Coconut Ice Cream (made with coconut milk)


You were always told to never trust a book by its cover. Well, you also shouldn't always judge a blog post by its title. Yes, this ice cream is made with coconut milk, but it is also made with cream. So, if you were looking for a non-dairy alternative, this isn't the recipe for you. BUT, if you are looking for a totally yummy ice cream recipe made with less dairy than usual, then you are at the right place. I made this ice cream the other day with coconut milk because I didn't have enough cream to make ice cream the old-fashioned way. I also didn't have any whole milk, but I did have one can of coconut milk in the cupboard. I have been seeing coconut milk ice cream recipes all over lately, so I improvised and was totally happy with the results!

The ice cream turned out amazingly delicious. It is the perfect amount of creaminess and it's a tasty tropical treat that is just perfect for hot and humid days like today. As an added bonus, it's super easy to make, as long as you have an automatic ice cream maker. And if you don't have one, you should buy one. Seriously.

Recipe for Banana Coconut Ice Cream 


INGREDIENTS:
1 13.5 ounce can of coconut milk
5 ounces of heavy cream
5 ounces of 2% milk
1/2 cup of granulated sugar
1 vanilla bean
3/4 tsp. of high quality vanilla extract
1 ripe small banana, mashed
3 Tbsp. of sweetened shredded flaked coconut

DIRECTIONS:
Put the coconut milk, cream, milk, and sugar into a large bowl. Use an electric hand mixer set on medium low speed to mix ingredients together until well incorporated. Split the vanilla bean lengthwise and scrape out the inside, and add the vanilla beans to the bowl. Discard of the vanilla bean. Add in the vanilla extract and mashed banana, then mix together with a whisk or with the electric hand mixer until all the banana is incorporated and the mixture is smooth.  Cover the bowl and put it into the fridge for about an hour.

Pour the batter into the bowl of an automatic ice cream maker and make according to manufacturer directions. Add the shredded coconut into the ice cream maker bowl while it is running, about 5 minutes before it is finished. Put ice cream in an airtight container, put in the freezer, and eat after it has set for about 30 minutes. YUM!

Top ice cream with extra coconut and some pretty sugar sprinkles, if desired.

Tuesday, June 18, 2013

Toasted Almond Joy Cupcakes


Mmm, who wants to eat a cupcake? I do! These cupcakes are quite spectacular! I had it in my head that I wanted to make chocolate coconut cupcakes, and I was basing it off of this coconut cupcake recipe. I checked the web for ideas, but I couldn't really find any recipes that had chocolate and coconut combined in the batter of a cupcake. So then I called my mom for ideas, and she said she didn't think it would work. But why? Chocolate is good, coconut is good, why wouldn't they be doubly as good in one cupcake? She couldn't answer my question, but she told me to trust her. I did, even though I was tempted to try it out. I held back, and instead I created these cupcakes, and they turned out better than I could have imagined. They start with a basic chocolate cupcake, then are topped with the best cream cheese frosting, and then they are sprinkled with toasted coconut and toasted almonds. And if that isn't enough to put them over the top, they are then drizzled with a dark chocolate ganache. YUM. I didn't get to eat many cupcakes because Greg hoarded them all - that's how much he liked them. We did share some cupcakes with my parents on Father's Day, and they were a huge hit with both of them. I have to  give my mom some of the credit since she convinced me not to mix the chocolate and coconut together in the batter!

I did have a hard time naming these because "Chocolate Cupcakes with Cream Cheese Frosting, Toasted Coconut, Toasted Almonds, and Chocolate Ganache" was way too long of a title. So I came up with "Toasted Almond Joy Cupcakes." I think it works.

This recipe makes 18 delectable cupcakes. In case you want to make 6 cupcakes rather than the full 18, I went ahead and made it easy by putting the correct measurement for 6 cupcakes in parenthesis after each ingredient. You're welcome!

Recipe for Toasted Almond Joy Cupcakes

INGREDIENTS:
For the chocolate cupcakes
1/2 cup + 1 Tbsp. of Dutch-processed cocoa powder (3 Tbsp.)
1/2 cup + 1 Tbsp. of very hot water (3 Tbsp.)
2 1/4 cup of all-purpose flour (3/4 cup)
3/4 tsp. of baking powder (1/4 tsp.)
3/4 tsp. of baking soda (1/4 tsp.)
1/2 tsp. of salt (a little over 1/8 tsp.)
2 sticks plus 1 Tbsp. of unsalted butter, softened at room temperature (5 2/3 Tbsp.)
1 2/3 cup of granulated sugar (1/2 cup + 1 Tbsp.)
3 large eggs, at room temperature (1 large egg)
2 Tbsp. of heavy cream (2 tsp.)
1 Tbsp. of pure vanilla extract (1 tsp.)
1 1/2 tsp. of chocolate extract - optional (1/2 tsp.)
3/4 cup of low-fat plain yogurt (1/4 cup)
1/2 cup of granulated sugar (for brushing, to keep cupcakes moist)
1/2 cup of water (for brushing, to keep cupcakes moist)
For the cream cheese frosting 
2 sticks of unsalted butter, at room temperature (5 1/3 Tbsp)
1 1/2 8-ounce packages of cream cheese, softened at room temperature (1/2 package)
2 cups of powdered sugar, sifted (2/3 cup)
1 1/2 tsp. of pure vanilla extract (1/2 tsp.)
3/4 tsp. of pure almond extract (1/4 tsp.)
For the topping
1 cup of sweetened shredded flaked coconut (1/3 cup)
30 raw almonds, chopped (10)
For the chocolate ganache
4.5 ounces of semisweet baking chocolate, finely chopped
1/2 cup of heavy cream
*Any extra you can store in an airtight container for later use, you will have extra if you are only making the 6 cupcakes.

DIRECTIONS:
First, toast the coconut and almonds for the topping. Preheat the oven to 325 degrees. Spread the coconut and almonds in a single layer on a baking pan. Put in oven and cook for about 5 minutes, toss around with a spoon, then cook for another 5 - 10 minutes or until toasty-looking. Remove from oven and set aside.

Make the cupcakes.
Adjust oven temperature to 350 degrees. Line cupcake tins with paper liners. Put the cocoa powder in a smallish bowl. Add the hot water (I brought the water to just a boil and then let it cool for about a minute) to the cocoa powder and then whisk together until the mixture is smooth. Set aside. In a medium-sized bowl, add the flour, baking powder, baking soda, and salt. Sift ingredients together.

Put the softened butter and granulated sugar into a medium saucepan and set over medium-low heat. Cook, stirring almost constantly, until the butter is fully melted and the mixture is smooth. Pour the mixture into a large bowl, then use an electric hand mixer set on medium speed to mix until the mixture becomes cool, about 4 minutes. Add the eggs one at a time into the mixture, and mix well on low after each addition. Add in the heavy cream, vanilla extract, and chocolate extract and blend. Add in the cocoa mixture and blend until smooth. Set the hand mixer on low speed, and then add in 1/3 of the flour mixture. Keep the mixer running, and then add in 1/2 of the yogurt, another 1/3 of the flour mixture, the rest of the yogurt, and finish with the flour mixture. Blend together until just incorporated.

Divide the cupcake batter into the liners (I use a cookie dough scoop for less messes). Put the cupcakes in the oven and cook for about 20 minutes. Rotate pans halfway between baking. Remove from oven and let cool for 5 minutes, then transfer to a wire rack to let them cool completely.

To help with keeping the cupcakes moist, brush each one with sugar water. Put 1/2 cup sugar and 1/2 cup water into a small saucepan and set over medium heat. Stir constantly until it comes to a simmer and sugar is fully dissolved. Remove from heat. Lightly poke the tops of each cupcake with a fork. Dip a brush into the sugar water and brush the tops of each cupcake with the mixture.

For the frosting
Put the softened butter and cream cheese into a large bowl. Blend together with an electric hand mixer set on medium-high speed until smooth. Blend in the vanilla and almond extracts. Add in 1/2 of the powdered sugar and blend on medium speed until fully incorporated. Add in the rest of the sugar and blend again until completely smooth.

Frost the cupcakes with the cream cheese frosting. Line cupcakes on a pan. Sprinkle each one with the toasted coconut and toasted almonds.

For the chocolate ganache
Put the finely chopped chocolate into a small bowl. Put the cream in a small saucepan and set over medium heat until it just comes to a boil. Immediately pour the cream over the chopped chocolate and stir until completely smooth. Let cool for a minute before topping cupcakes. Use a fork or spoon to drizzle chocolate ganache over the tops of each cupcake. Sprinkle on more coconut and almond mixture, if desired.

Put the cupcakes into an airtight container and store in the fridge until ganache hardens (about 20 minutes). If not serving right away, keep in the fridge until ready to serve. Cupcakes can be stored for up to a week in the fridge.

Chocolate Cupcake Recipe Adapted from: Annie's Eats

Chocolate Ganache Recipe from: All Recipes

If you love chocolate and coconut, try the recipe for coconut truffles!


Thursday, May 30, 2013

May 31st is National Macaroon Day!

Wow, this week is full of fun holidays! On Sunday, I celebrated National Blueberry Cheesecake Day with blueberry cheesecake bars. Tomorrow, I'm celebrating National Macaroon Day AND Greg's 40th birthday with some coconut macaroons. The coconut macaroons are one of Greg's favorite treats (and mine too). Will you be celebrating National Macaroon Day too? If you weren't planning on it, I think you need to reconsider...

You can try the coconut macaroons with almonds and chocolate


Or you can try the best coconut macaroons ever


Both recipes are super easy to make and they do not use any egg! I think you need to celebrate this fabulous day and make a batch of coconut macaroons. Enjoy! 

Sunday, May 26, 2013

Blueberry Cheesecake Bars (It's National Blueberry Cheesecake Day)!

Did you know that today is National Blueberry Cheesecake Day? Well, it is! May 26th is a day that is dedicated to eating blueberry cheesecake. I found out about it this past week while I was out on the boat  reading Self Magazine. I made a mental note to myself to remember to make blueberry cheesecake this weekend so I could celebrate such a joyous occasion.

Instead of making a cheesecake, I decided that cheesecake bars would be a better choice. They are easier to make than a cheesecake AND they have less calories (but still lots of yummy yummy goodness). I made the bars last night to serve for dessert, but we ended up eating them as a mid-day snack before dinner. Greg ate two large bars & said he really liked them, which is good, because earlier in the day he had said we didn't need to eat dessert. And obviously he didn't know that we really did NEED the blueberry cheesecake bars, otherwise, we'd be ignoring a national holiday!

Hope everyone has a wonderful blueberry cheesecake day & Memorial Day. Enjoy!

Recipe for Blueberry Cheesecake Bars with Lemon 

INGREDIENTS:
For the crust
1 1/2 cup of graham cracker crumbs
2 1/2 Tbsp. of granulated sugar
A pinch of lemon zest
4 1/2 Tbsp. of unsalted butter, melted

For the cheesecake filling
2 8-ounce packages of cream cheese, softened at room temperature
1/2 cup + 1 Tbsp. of granulated sugar
Zest of 1 large lemon
Juice from the large lemon
A dash of ground nutmeg (what is a dash)?
2 eggs

For the blueberry topping
2 cups of fresh blueberries
1/2 tsp. of freshly squeezed lemon juice
1/2 tsp. of granulated sugar
A pinch of ground nutmeg

DIRECTIONS:
Make the crust. Preheat the oven to 325 degrees. Grease the bottom of a 9 x 9 pan with butter. Put the graham cracker crumbs, granulated sugar, lemon zest, and melted butter into a bowl. Use a spoon to mix ingredients together. Spoon mixture into the prepared pan and use your hands to evenly press crumbs down so they cover the bottom of the pan. Put pan into the oven and cook for 12 minutes. Remove from oven and let cool.
While the crust is cooling, make the filling. Put the cream cheese, sugar, lemon zest, lemon juice, and nutmeg into a large bowl. Use an electric hand mixer set on medium speed to beat together until well incorporated. Add in the eggs. Beat again with the hand mixer on medium-high speed until the mixture is smooth, about 4 minutes.
Rinse the blueberries and pat dry. Put them into a smallish bowl. Add the lemon juice, sugar, and nutmeg to the blueberries and toss to coat.
Spread the cream cheese mixture evenly on top of the crust. Use a spoon to drop the blueberries evenly on top of the cream cheese mixture. Place in oven and cook for 40 minutes. Remove from oven, let cool completely, and then place in the fridge for 4 hours before serving. When ready to serve, use a sharp knife to cut into 12 - 16 bars. Enjoy!

Each bar has approximately 210 - 275 calories (one slice of cheesecake has about 600 calories)!

Recipe Adapted from the Food Network

Saturday, May 11, 2013

Oreo Truffles with Mascarpone Cheese & Dark Chocolate


I went to a bridal shower this weekend for a friend of mine that I used to work with. I took the day off on Friday to help the shower hostess cook some amazing yummies for the event. I also made truffles this week to share at the shower. I made an old favorite, the coconut truffles, and a new favorite, the dark chocolate lime truffles. I also tried out a new recipe for Oreo truffles. They were much better than I had expected. I have tried them before and I wasn't a huge fan, but I used Mascarpone cheese in place of cream cheese and I used a high quality dark chocolate for dipping. They were a success. One of my friends who said he can't stand dark chocolate ended up trying one, and he absolutely loved them. Does that count as converting someone?

Oreo cookies are pretty nostalgic. When I snacked on them while making the truffles, it brought back memories of being a kid and eating Oreos and milk when I got home from school. The Oreo truffles are more grown-up, but I think kids would love them too. They are also really easy to make - they are actually one of the easiest truffles I have ever attempted. If you would like to try to make truffles, I'd recommend starting with this Oreo truffle recipe. There are only a few ingredients and the truffles are really easy to roll. If you can't find the Mascarpone cheese, you can use cream cheese. But I think the Mascarpone cheese has a nicer flavor.

I hope you enjoy the Oreo truffle recipe. I made over 100 truffles this week, so it might be awhile before I make any again! I have some leftover from the shower and every time I open the door of my refrigerator they tempt me (and yes, I give into temptation)!

Recipe for Oreo Truffles with Mascarpone Cheese & Dark Chocolate 
INGREDIENTS
For the filling 
45 Double Stuff Oreo Cookies (1 1/2 packages)
12 ounces of Mascarpone Cheese
3/4 tsp. of vanilla extract
For dipping/topping
10 ounces of bittersweet chocolate (70%) cocoa -
I used a 9.7 oz Scharrfen Berger bar
2 - 3 crushed Oreo cookies

DIRECTIONS
For the filling
Put the Oreo cookies into the bowl of a food processor fitted with a metal blade. Pulse several times, until the cookies turn into fine crumbs. Put the Oreo crumbs and the Mascarpone cheese into a large bowl. Use an electric hand mixer to mix on medium speed until the ingredients are well incorporated and you no longer see the white of the Mascarpone cheese. Add in the vanilla extract and mix. Cover the bowl with a lid and place in the fridge for 1 - 2 hours.
Line a couple tupperware containers with parchment paper. Take the Oreo truffle mixture out of the fridge and use a cookie dough scoop to scoop up the mixture and then shape into 1-inch balls. Cover the containers and place in the freezer for at least 2 hours.
For dipping/topping
Place the crushed Oreos in a bowl and place near where you will be dipping the truffles.
Line a baking sheet with parchment paper. Chop up the dipping chocolate into smallish pieces and place it in a double boiler saucepan. Put about an inch of water into the bottom pan of a double boiler and set it over medium heat. Once the water begins to simmer and steam comes up, fit the saucepan with the chocolate on top. Use a spoon to stir the chocolate frequently, until it is completely melted and smooth. Turn off the burner heat. Take containers out of freezer. Drop one or two of the balls into the chocolate and use a spoon to coat completely with the chocolate. Place onto the prepared baking sheet, and then sprinkle a little of the crushed Oreo on top. Continue this process, working quickly, until all of the truffles are coated. Place the pan in the fridge and allow the chocolate to harden before serving. Should be ready to eat within 20 minutes. Enjoy one with a small glass of milk!

Oreo Truffle - filled with crushed Oreos, Mascarpone cheese & vanilla extract. So easy! 
Recipe makes about 45 - 50 truffles
Oreo Truffle recipe adapted from several different sources on the Internet.