Translate

Friday, September 28, 2012

Easy Chocolate Truffles (made with cocoa powder)

Recipe for Easy Chocolate Truffles

INGREDIENTS:

Please visit my new website, Make It and Bake It with Beth, for the Easy Chocolate Truffles recipe


NOTE: To toast the coconut, preheat oven to 325 degrees. Place desired amount of sweetened flaked coconut in a baking pan and spread it evenly over the pan. Place the pan in oven & cook for  about 15 minutes, or until coconut is lightly browned. 

Tuesday, September 25, 2012

Spicy Sesame Noodles


Last week I was feeling overwhelmed in the evenings because I was trying to juggle my work, school, home, and social responsibilities all at once. In the coming months, I am going to be looking to make more quick and easy weeknight meals (someone please tell me why I decided to go back to school...). These spicy sesame noodles are one of my go to meals when I am feeling pressed for time. They are really easy to make, and I usually have all of the ingredients on hand. Another great thing about this meal is that it barely makes any mess and it is ready to eat within 20 - 25 minutes from start to finish. This recipe was passed on to me 2 years ago from a friend/coworker, and it was passed on to her from her mother.  I love the flavors of the sesame oil, honey, and spicy red pepper flakes. It is so good! If you are afraid of spice, make sure to really cut down on the amount of red pepper flakes that you use in the recipe. The recipe makes at least 8 generous servings of noodles. The noodles can be enjoyed hot, warm, or cold. Make sure to top each serving with toasted sesame seeds or crushed peanuts. Enjoy!

Recipe for Spicy Sesame Noodles 

INGREDIENTS:
1/4 cup of corn oil
1/4 cup of sesame oil
1 Tbsp. of chili oil (optional)
1 1/2 tsp. to 1 Tbsp. of crushed red pepper flakes
1/2 tsp. of dried onion flakes
5 Tbsp. of honey
3 Tbsp. of soy sauce
1 tsp. of salt
1 16-ounce package of spaghetti noodles
3 Tbsp. of toasted sesame seeds or crushed peanuts

DIRECTIONS:
Put a large pot of water on the stovetop and set on high to bring to boil (for the spaghetti noodles).

Put the corn oil, sesame oil, and red chili oil in a small saucepan set over medium heat. Add in the crushed red pepper flakes and onion flakes, stir. Let the oil, pepper flakes, and onion flakes cook for about 2 minutes (make sure to watch the pan while the oil is cooking - you don't want the oil to get too hot). Remove the saucepan from heat. Add in the honey, soy sauce, and salt and mix well. Set aside.

Once the water begins to boil, add some salt to the water. Add the spaghetti noodles to the pot of boiling water and cook according to package directions. Drain noodles well and then put them into a large bowl. Pour the oil and honey mixture over the noodles and mix. Serve the noodles hot or allow them to cool to room temperature. Top each serving with crushed peanuts or toasted sesame seeds. Eat with chopsticks, if desired!

To toast the sesame seeds: Scatter the sesame seeds in an even layer on a toaster oven baking pan. Toast in the toaster oven for 5 - 7 minutes. This can be done before you begin making the meal, or it can be done while the spaghetti is cooking.

Recipe Adapted from: Cathy Holcombe (this may be my friend's mother...or it is the 
person my friend's mother got the recipe from)

COMMENTS:
I know we all have busy schedules. Would you like to share your favorite quick & easy weeknight meal? If so, please leave a comment on this post! Thank you.


*Are you looking for more tasty noodle meals? Check out the recipes for cilantro-peanut pasta salad and soba noodle salad. Both recipes are easy to make & they are delicious!*


Saturday, September 22, 2012

Lemon Cupcakes with a Lemon Buttercream Frosting


My friend said the lemon buttercream frosting is "ridiculous in a ridiculously good way!"
Who loves lemon? I love lemon, and I also love this recipe for lemon cupcakes. The cake of the cupcake uses cake flour, which is an absolute must in this recipe - so no substitutions. Cake flour makes these cupcakes light and airy. You can find cake flour in the baking section at most all grocery stores. I use the Softasilk brand of cake flour. The flour is fine, silky, smooth, and perfect for this tender cupcake. Not only is the cake good, but the frosting on these cupcakes is also pretty incredible. Due to popular demand, I took these cupcakes to work last week, and one of my coworkers described the frosting as "ridiculous in a ridiculously good way!" 

I think you will really enjoy these cupcakes. The cake is amazing, the lemon buttercream frosting is ridiculously good, and the candied lemons add a nice touch. The candied lemons are edible - they taste like lemon candy! Yum. 

Recipe for Lemon Cupcakes with a Lemon Buttercream Frosting

For the cupcakes
INGREDIENTS:
3 sticks of unsalted butter (softened at room temperature)
2 cups of granulated sugar
3 cups of cake flour (no substitutions)
1 tsp. of baking powder
1/2 tsp. of salt
1/2 tsp. of baking soda
5 large eggs
2 tsp. of vanilla extract
Zest of 2 lemons (save lemons to juice them)
4 Tbsp. of freshly squeezed lemon juice 
1 cup of buttermilk

DIRECTIONS:
Preheat the oven to 325 degrees. Line two 12-cup muffin/cupcake tins with paper cupcake liners.

Add the softened butter and sugar to a large bowl. Beat the butter and the sugar together with an electric hand mixer on medium speed until the mixture is light and very fluffy (about 5 minutes or so).

In a medium bowl, add the dry ingredients (flour, baking powder, salt, and baking soda). Sift the ingredients together and set aside.

Add the eggs, one at a time, to the butter and sugar mixture. Make sure to beat egg into the mixture on low speed after each addition. Stir in the vanilla extract, lemon juice, and lemon zest. 

Now beat in the dry ingredients and the buttermilk in alternating additions to the butter, sugar, and egg mixture. First add about a third of the dry ingredients to the mixture and mix on low speed until just incorporated. Then add about half of the buttermilk to the mixture and mix on low speed. Continue alternating the dry ingredients and buttermilk into the mixture, ending with the dry ingredients. Make sure that all of the ingredients are well incorporated and that the mixture is fluffy.

Using a cookie dough scoop or small ladle, scoop the batter into each cupcake liner. Fill the liners with the batter almost to the tops, because the batter does not rise much.

Bake cupcakes for 20 - 25 minutes. Remove from oven and cool completely. Once cooled, frost with the lemon buttercream frosting and garnish with the candied lemon slices, if desired. 

(Makes about 2 dozen cupcakes)

For the Lemon Buttercream Frosting
INGREDIENTS:
2 1/2 sticks of unsalted butter (softened at room temperature)
2 - 3 Tbsp. of freshly squeezed lemon juice
1 tsp. of lemon zest
3 cups of powdered sugar

DIRECTIONS:
Put the butter, lemon juice, and lemon zest in a medium mixing bowl. Using a hand mixer set on medium-low speed, beat together until the butter is smooth and creamy. Gradually add in the powdered sugar, about 1/2 cup at a time, and mix on low until the frosting is at a good consistency for spreading. 

Lemon Cupcakes with Lemon Buttercream Frosting Recipe from: Our Best Bites

Recipe for Candied Lemon Slices

INGREDIENTS:
1 cup of water
1 cup of granulated sugar
2 lemons 

DIRECTIONS:
Wash and dry the lemons. Slice the lemons very thinly, and cut into halves or quarters. Add the water and sugar to a small saucepan. Put the saucepan over medium-high heat until the sugar dissolves. Add the lemon slices to the pan in a single layer and reduce the heat to low. Simmer for 10 minutes, then use a fork to gently flip the lemons over. Simmer for another 10 minutes. Pour the lemons and syrup into an airtight container and store until ready to use.

Love Cupcakes? Love Coconut? You'll love the recipe for coconut cupcakes!

Thursday, September 20, 2012

Chocolate Egg Cream


Just like you shouldn't judge a book by its cover, you shouldn't judge this recipe by its name. There is no egg in a chocolate egg cream. If you are wondering what this mysterious chocolate egg cream is, it is a delicious chocolate beverage that I just discovered. I was flipping through a cookbook devoted to ch
ocolate (lots of great recipes), and I came across the chocolate egg cream recipe. I made it & loved it. What I loved about the egg cream was that it fulfilled my chocolate craving, but it did not seem too rich or indulgent. So, here is what it is - a chocolate egg cream is a fountain drink made of chocolate syrup, milk (I used cream in this recipe), and seltzer water. It originates back to the late 19th century, and it has been a very popular drink in Brooklyn, NY. Now it is a popular drink in my house! I think you will also really enjoy this tasty chocolate treat.

Recipe for Chocolate Egg Cream

INGREDIENTS:
2 Tbsp. of chocolate syrup (see recipe below)
2 Tbsp. of cream or half and half
Cold Seltzer water (the fizzier the better)

DIRECTIONS:
Put the chocolate syrup and cream in the bottom of a tall glass. Stir the syrup and cream together until it is smooth. Top the glass off with seltzer water. Best when sipped with a straw or spoon.

Recipe for Chocolate Syrup

INGREDIENTS:
1/3 cup of cocoa powder
1/2 cup of granulated sugar
4 - 5 Tbsp. of very hot water

DIRECTIONS:
In a small bowl, sift together the cocoa powder and sugar. Add in 2 Tbsp. of the water and mix until very smooth. Add in the rest of the water, one tablespoon at a time, until a good consistency is reached. Whisk until all of the cocoa powder and sugar are fully dissolved. Store chocolate syrup in an airtight container in the fridge for up to 3 weeks (like it wouldn't be gone by then...).

Recipe for Chocolate Syrup and Chocolate Egg Cream Adapted from: The Essence of Chocolate

NOTE:
For a really quick chocolate egg cream fix, use bottled or jarred chocolate syrup. However, the homemade chocolate syrup only takes a few minutes to make.

Monday, September 17, 2012

Maryland Lump Crab Cakes with a Lemon-Parsley Butter Sauce


s
Please visit my new website, 
Make It and Bake It with Beth, for

Wednesday, September 12, 2012

Baked Pumpkin Oatmeal with Caramelized Bananas


Finally, fall weather is here in Maryland. I have survived another hot, muggy, swampy, humid, sticky and (insert other adjectives for disgustingly gross weather here) summer. We finally have gotten relief, and I can smell fall in the air. I could also smell cinnamon in the air this past weekend, after making this delicious baked oatmeal for breakfast.

This baked pumpkin oatmeal with caramelized bananas is so yummy on a fall (or cool September) morning. It is the perfect start to the day. I have made this oatmeal dish several times, and I have been looking forward to being able to make it again (nobody wants oatmeal in the summer time). It smells delicious as it bakes in the oven, and when you eat it, it comforts your soul. This recipe makes a lot, so it's great for a family on a Saturday or Sunday morning, or you can eat if for leftovers during the week. For an extra special touch, top each bowl of oatmeal off with some cream or toasted pecans. Yummy!

Happy Fall to everyone!

Recipe for Baked Pumpkin Oatmeal with Caramelized Bananas

INGREDIENTS:
For the caramelized bananas
2 Tbsp. of unsalted butter
2 medium bananas, cut in 1/4" slices
2 Tbsp. of dark brown sugar
1/2 tsp. of cinnamon
For the oatmeal
1 cup of steel cut oats
4 Tbsp. of unsalted butter
4 cups of very hot water
3 cups of old-fashioned oats (such as Quaker Oats)
1/2 cup of dark brown sugar
1/4 cup of maple syrup
3/4 tsp. of salt
1/4 tsp. of nutmeg
2 tsp. of cinnamon
pinch of ground cloves
1/2 cup of canned pumpkin
1/2 cup of milk
1 1/2 tsp. of vanilla extract

DIRECTIONS:
For the caramelized bananas 
-(Make the bananas after mixing together the steel cut oats, butter, and hot water in a large bowl - see steps for oatmeal mixture below)-
Melt the 2 Tbsp. of butter in a large skillet set over medium-high heat. Once the butter has melted, add in the sliced bananas, dark brown sugar, and cinnamon. Toss the ingredients gently and cook for about 2 minutes. Remove the skillet from the heat and turn off the stovetop. Allow the bananas to cool. 
For the oatmeal mixture
Put the steel cut oats and 4 Tbsp. of butter in a very large heat-safe bowl. Pour the 4 cups of very hot water over the oats and butter, and then cover the bowl with tightly with a lid. Let rest for 20 minutes.
-(While the oatmeal is sitting, make the caramelized bananas)-
Once the steel cut oats have sat for 20 minutes, preheat the oven to 350 degrees. Then add in the old-fashioned oats, dark brown sugar, maple syrup, salt, nutmeg, cinnamon, and cloves to the bowl with the steel cut oats. Stir well. In a separate bowl, mix together the canned pumpkin, milk, and vanilla extract. Blend the pumpkin mixture into the oatmeal mixture. 
Spread the caramelized bananas into the bottom of a 2-quart baking dish. Pour the oatmeal over the caramelized bananas. Cook the oatmeal in the oven for 40 minutes. Let the oatmeal cool for a few minutes before serving. Enjoy!

Recipe Source: Annie's Eats

COMMENTS: What are your fall weather comfort foods? Let me know by leaving a comment on this post!

Monday, September 10, 2012

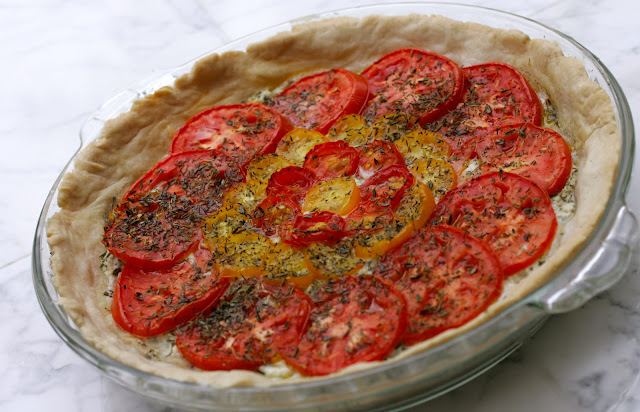
Three Tomato Pie


Last week something very exciting happened. I went out into my garden to cut some zinnias, and I noticed that there were TONS of cherry tomatoes on a couple of the tomato plants. I think I started jumping up in down because I was so happy (wow, my life must be pretty boring). Before last week, we had only picked a total of 4 cherry tomatoes at a time off of the plant. Our large tomatoes didn't do well either. Well, I ended up picking about 40 cherry tomatoes from the plants and another 50 just the other day. The cherry tomatoes are obviously late bloomers (I guess they take after me)!

I couldn't not make something with the tomatoes from my garden. I was thinking of making the cherry tomato tart with the basil garlic crust, but then I remembered that my mom had sent me a recipe for this tomato pie. I remember her making the pie a couple times many years ago, and I decided that it might be fun to make. It's completely different than the cherry tart. Instead of mozzarella cheese it uses ricotta, and instead of using basil it uses thyme. It is also healthier than the tart because ricotta cheese is much lower in calories than mozzarella. It's also packed with protein! I would guesstimate that a piece (1/8 of the three tomato pie) has under 250 calories. Not too shabby - especially because it is filling & delicious. I've made it twice in the past week. And, if I get some more cherry tomatoes, I just might have to make it again! Enjoy!

Recipe for Three Tomato Pie

INGREDIENTS:
For the crust
1 1/3 cups of all-purpose flour
1/3 tsp. of kosher salt
4 1/2 Tbsp. of vegetable shortening
4 Tbsp. of ice cold water
For the filling
1/2 cup of fresh parmesan cheese, grated
2 egg whites
1 cup of part-skim ricotta cheese
2 tsp. of dried thyme leaves, plus more for sprinkling
3 cloves of garlic, pressed
freshly ground black pepper
3 - 4 roma tomatoes, cut in 1/4-inch slices
6 - 7 yellow cherry tomatoes, sliced (not in half, but in thin slices)
3 - 4 red cherry tomatoes, sliced (not in half, but in thin slices)
1 Tbsp. of Extra-Virgin olive oil
Salt, for sprinkling

DIRECTIONS:
For the crust
Put the flour and salt in the bowl of a food processor fitted with a metal blade. Pulse until just combined. Add the 4 1/2 Tbsp. of shortening to the bowl. Pulse, several times, until the mixture because crumby. With the processor running, pour 1 Tbsp. of the cold water through the feed tube. Continue to add more water through the tube until the mixture forms into a ball and leave the sides of the bowl. Gather up the dough and slightly flatten it into a disc. Wrap in saran wrap and put in the fridge for 30 minutes. After about 20 minutes, preheat the oven to 450 degrees.
After dough has been in the fridge, take it out and place it into a 10-inch pie pan. Press it out evenly over the bottom of the pan and press the dough up on the sides of the pan. Cover the dough with a piece of foil and fold the foil over the edges of the pie pan. Put pie weights on the foil; in the center of the pan. Bake the dough in the preheated oven for 5 minutes. After 5 minutes, carefully remove the weights and foil from the pan. Place back in the oven and cook for another 6 - 7 minutes. Remove from oven and lower the oven temperature to 330 degrees. Make the filling.
For the filling
Pour the egg whites into a medium-sized bowl (to easily separate egg whites and yolks, use an egg separator). Add the ricotta cheese in with the egg whites. Use a fork to mix the egg whites and ricotta cheese together, until smooth. Add in the pressed garlic, thyme, and freshly ground black pepper (about 5 - 6 grinds). Mix.
For assembling
Scatter the grated parmesan cheese evenly over the bottom of the cooked pie crust. Spread the ricotta mixture evenly over the cheese. Put the tomatoes on the ricotta layer. Arrange the sliced Roma tomatoes  so they are up against the edge of the crust and overlap them to form a circle. Place all but one slice of the yellow cherry tomatoes right inside of the Roma tomatoes, and arrange them into a circle. Then arrange the red cherry tomatoes inside of the yellow cherry tomato circle. Place the one yellow cherry tomato slice in the last inner circle. Evenly drizzle the one tablespoon of olive oil over the tomatoes. Sprinkle a generous amount of thyme over the tomatoes and sprinkle on some salt. Top with a couple grinds of freshly ground black pepper.
Place the assembled tomato pie in the oven. Bake for 30 minutes, rotating the pie 180 degrees halfway through cooking. Allow to cool slightly before slicing and serving.

Recipe Adapted from: Better Homes and Gardens

COMMENTS: What is your favorite dish that you like to make with tomatoes? Let me know by posting a comment! 

Saturday, September 8, 2012

Cashew-Encrusted Mahi Mahi with a Rum Butter Sauce


I love fish. I don't really understand people who don't like fish. I especially don't understand the people who say they don't like fish because it tastes "too fishy." I do think I know what people are talking about, but if a fish is prepared well,  it shouldn't taste fishy. The fish should absorb the flavors of the spices or coatings that it is made with. One of my favorite fish dishes that I have made is this cashew-encrusted Mahi Mahi. I adapted the fish and sauce recipe from the McCormick & Schmick cookbook.

I was really happy to come across this recipe. I had tried to encrust fish on my own before, and the results were always disastrous. The coating would never stick and I'd end up practically in tears by the time I was finished cooking the fish - and the meal would usually end up in the trashcan. So much time and effort (and money) wasted. So, when I followed this recipe and the coating stuck, I was ecstatic. I was also excited because it tasted so yummy! It does make a mess and it does take some time, but it is worth it in the end. If you don't want to make a rum sauce, the fish actually is really good without any sauce at all. Or you can find some other sauce recipes online. Enjoy!

Recipe for Cashew-Encrusted Mahi Mahi with a Rum Butter Sauce
INGREDIENTS:
2 pieces of Mahi Mahi (about 6 ounces each)
Flour for dusting
2 eggs
2 Tbsp. of milk
1 1/4 cup of unsalted cashews
1/4 cup of vegetable oil
Chopped red and yellow bell peppers, for garnish
Rum butter sauce (recipe below)

DIRECTIONS:
First, ground the cashews. Place them in the bowl of a food processor fitted with a metal blade. Pulse until the cashews are finely ground. Pour the ground cashews into a large bowl. Set aside.
In a medium-sized bowl, beat the two eggs together. Mix in the 2 Tbsp. of milk. Set aside.
Dust the 2 pieces of fish with flour (make sure the fish is fully thawed and patted dry before dusting). Dip one piece of fish in the egg mixture, and then immediately dip in the ground cashews. Make sure to coat the piece of fish entirely with cashews, then set it on a large plate. Dip the next piece of fish in the egg mixture and cashew mixture, and place it on the plate with the other piece. Place the fish in the refrigerator for an hour. If you are using the rum butter sauce or another type of sauce, now would be a good time to make it while the fish is resting in the fridge.
When you are ready to cook the fish, place the 1/4 cup of oil in a large electric skillet. Turn the skillet on medium heat. Once the oil is hot enough, place the coated fish in the skillet. If needed, adjust the skillet temperature. Cook the fish for about 4 - 5 minutes. Carefully flip each piece of fish and let cook for another 3 - 4 minutes; longer if needed. The cashew crust should be golden brown in color when it is done.
Top fish with the diced bell peppers. Drizzle the fish with the rum butter sauce or serve it on the side for dipping. Serve fish with your favorite sides. It pairs well with plain rice and steamed asparagus.

For the rum butter sauce
INGREDIENTS:
1 vanilla bean
1 1/2 Tbsp. of light rum
1 1/2 Tbsp. of dark rum
1 Tbsp. of freshly squeezed lime juice
1 jalapeno pepper, chopped very finely (seeds and veins for heat; removed for less heat)
1 Tbsp. of sugar
5 Tbsp. of unsalted butter; cold & cut into 1-inch pieces

DIRECTIONS:
Cut the vanilla bean down the middle. Place it into a small saucepan. Add in the light and dark rum, lime juice, jalapeno pepper, and sugar. Place the saucepan over medium heat and cook, stirring occasionally, until the mixture is reduced to just a couple of tablespoons.
Remove the saucepan from the heat. Stir in a few pieces of the butter and stir the butter until it melts. Continue to add a few pieces of butter at a time, allowing it to melt before adding in any more. Keep the sauce on the stove until ready to serve, but do not keep it over direct heat.

Recipe Adapted from: McCormick & Schmick's Seafood Restaurant Cookbook - Second Edition


Yes, the picture is a little random - but posting this recipe reminded me
of the sailboat charter trip I took with Greg to the British Virgin Islands.
In BVI, it's not an option to not eat fish or seafood for dinner! 

Wednesday, September 5, 2012

Purple Basil Vinegar


The inspiration for today's post comes from my mother, Lynda. For several years my mom has been making purple basil vinegar, and the stuff is amazing.

Although it might not feel like it outside, summer is drawing to a close. If you would like to capture summer and enjoy it all year long, consider making yourself some purple basil vinegar! You'll be able to enjoy the vinegar in so many ways. It taste great mixed with olive oil and drizzled on tomatoes and cucumbers. You can drizzle the basil vinegar and some oil on sandwiches for extra flavor. The basil vinegar can be used for an incredible vinaigrette for salads. Yum!
If you do not have any purple basil, you can look for some at your local farmer's market.
Or, purchase purple basil plants or seeds at a garden center so you can grow it next year!

Recipe for Purple Basil Vinegar
INGREDIENTS/MATERIALS:
A lot of purple basil (stems and all)
A large glass jar that has a lid (don't use metal)
Bottles of seasoned rice vinegar (save vinegar bottles and lids)
A large pitcher
A funnel
A wooden spoon

DIRECTIONS:
The amount of basil and vinegar you use will depend on the size of jar you pick. You want to have enough basil to be loosely packed full in the jar; and enough vinegar to cover the basil.

Wash the basil vinegar and shake off the water. Let the basil rest on a towel for a few minutes. Lightly crush the purple basil leaves to release their scent. Loosely pack the basil leaves into the glass jar. Pour the vinegar into the jar so that the basil leaves are fully covered. Tightly cover the jar, and let it sit out for 2 - 3 weeks.

Once the vinegar has set for ample time, prepare the vinegar bottles for use. Soak the vinegar bottles in a sink full of water for several hours, until the labels come off. Then run the bottles through the dishwasher. 

Strain the vinegar through a fine mesh sieve into a large pitcher. To get as much flavor as possible from the basil, press down on the basil with a wooden spoon and allow juices to seep into the pitcher. Use a funnel and pour the vinegar from the pitcher into the clean glass bottles.

Store vinegar at room temperature. Can be enjoyed all year long.
Purple Basil Vinegar in bottles.

Recipe Source: Lynda 

NOTE: For a basil vinaigrette, mix together basil vinegar, olive oil, and 1/2 package of Good Seasons salad dressing mix. For amounts, follow the directions on the Good Seasonings package. 


Sunday, September 2, 2012

Quinoa, Corn & Black Bean Wraps (or dip)


The other week I went over to a friend's house for a quick visit. She had made a yummy quinoa dip that we ate with chips, and she told me she would email me the recipe. I made the dip at the beach for lunch two times, and then this week I made it for dinner - but I served it in tortillas to make wraps. After making it for dinner, I planned on taking a picture the following day for the blog. Well, Greg had eaten the rest of it for lunch - so I had no picture, unless I wanted to take a picture of the empty bowl he left out...!

I decided to make it again this weekend. Luckily it's really easy to make and doesn't take much time to prepare. I love this meal because it's super healthy and filling. You can serve it for dinner or you can serve it as an appetizer with chips. Greg and I ate it with chips yesterday for lunch. It makes a lot, so if you make it as a dip, consider serving it at a party! Enjoy.

Recipe for Quinoa, Corn & Black Bean Wraps (or dip)

INGREDIENTS:
We ate the meal as a dip for lunch the next day! 
1 cup of quinoa, cooked and cooled
2 cans of black beans, drained of juices
Corn kernels from 3 medium ears of corn
3 limes, juiced
1 tsp. of olive oil
1/4 tsp. of kosher salt
1/8 tsp. of cumin powder
a few grinds of freshly ground black pepper
3/4 cup of fresh cilantro leaves, torn in smallish pieces
1 cup of cherry or grape tomatoes, halved
1 - 2 avocados, chopped in 1-inch chunks
6-inch soft flour tortillas (if doing wraps)
Your favorite tortilla chips (if making as a dip)

DIRECTIONS:
Cook the quinoa according to package directions. Once quinoa is fully cooked and drained of excess water, pour it in a separate bowl and set aside to cool.

While quinoa is cooling, use a shearing knife to carefully cut the corn kernels off the cob. Combine the black beans and corn kernels in a large bowl. Once the quinoa has cooled, add it to the bowl with the beans and corn. Add the juice of the 3 limes to the bowl. Add in the tsp. of olive oil. Sprinkle the mixture with the kosher salt and cumin powder. Add in a few grinds of freshly ground black pepper. Add in the 3/4 cup of cilantro leaves. Stir the mixture to combine all of the ingredients. Cover the bowl, and set in the fridge for about 45 minutes (to allow flavors to meld together). Right before serving, chop up the tomatoes and avocado and add to the bowl. Mix.

If serving wraps, spoon 2 - 3 tablespoons of the mixture down the middle of a tortilla. Sprinkle with extra salt, if desired. Fold the tortillas and serve.

If serving dip, sprinkle the mixture with extra salt, if desired. Transfer to a serving bowl and serve with your favorite tortilla chips.

Recipe Adapted from: Foodie Gone Healthy


NOTE:
If you plan on eating more for leftovers the next day, it is a good idea to actually not add the tomatoes and avocados to the entire mixture. Just top the wraps or dip with the tomato and avocado before serving. Tomatoes and avocados don't hold up too well in the fridge overnight! Add extra tomato and avocado the next day before serving again.

*Love quinoa? You might like this CPK-inspired quinoa salad with arugula.*