Translate

Wednesday, November 28, 2012

Corn Pudding (kind of like the one from Chevys)


Have you ever had a meal at Chevys restaurant? If so, you should know that one of the best parts of the meal is the corn stuff that comes on the side. It is officially called "sweet corn tomalito," but I like to just call it corn pudding or yummy corn stuff. I came across a recipe for it on Our Best Bites awhile back, and I made a mental note to make sure to try the recipe. Well, I tried it out this past weekend. It was SO yummy. I made it again on Monday. And I think I'm going to make it again tomorrow.

I made the corn pudding to go along with a great meal. We had our friend over for dinner, and I served potato & chorizo tacos with smoky aioli, refried (without the frying part) beans, and corn pudding. I was hoping to have enough tacos leftover to eat the next day and for a picture, but Greg and George ate too much - and a picture never happened. That is ok, I'll just have to make the tacos again this weekend! But for now, here is a recipe for yummy corn stuff. Or corn pudding. Or tomalito. Whatever it is, it's good!

Recipe for Corn Pudding 

INGREDIENTS:
1 stick of unsalted butter, softened at room temperature
1/3 cup of masa harina
2 1/2 Tbsp. of cream
1/4 cup of water
1/4 cup of cornmeal
1/3 cup of granulated sugar
1/2 tsp. of baking powder
1/4 tsp. of salt
1 1/4 cups of frozen corn
Hot water (for the water bath in the oven)

DIRECTIONS:
Preheat the oven to 350 degrees.
In a large bowl, mix together the butter, masa harina, cream, and water. Use an electric hand mixer to beat it on medium speed for a few minutes, until the mixture is smooth.
In a small bowl, mix together the cornmeal, sugar, baking powder, and salt. Pour the cornmeal mixture into the wet mixture. Set the hand mixer on medium-low speed and beat the dry and wet ingredients together until well combined. Pour the corn (corn can be frozen or thawed) into the bowl and use a spoon to mix it in.
Spread the mixture evenly into an 8 x 8 square pan. Put the 8 x 8 pan into a 9 x 13 pan. Place the pans into the oven. Give the 9 x 13 pan a "water bath." Carefully pour the hot water into the 9 x 13 pan. Pour the water in until it comes up about one inch on the sides. Close the oven and cook for 50 minutes. Cool for a few minutes before serving. Serve with your favorite mexican meal, serve it for dessert, or eat it for breakfast! Enjoy.

Recipe Source: Our Best Bites

NOTE: Are you wondering what masa harina is? I was when I first saw the recipe. Learn more about masa harina here. 

Saturday, November 24, 2012

White Chicken Chili-Soup

I hope everyone had a very nice Thanksgiving holiday. I have really enjoyed my extra days off from work. I am sure that everyone probably ate way too much on Thanksgiving, and the foods that they ate were pretty gluttonous. That is why I am choosing to post this recipe for this chili-soup, because it is a healthy & delicious meal! I call this a chili-soup because it really is a cross between the two. It is not too chunky or too soupy, it is just right! My friend emailed me this recipe last year from All Recipes. I have made it a few times, and it never disappoints. It is packed full of delicious flavors - including cumin, cilantro, and lime. The recipe makes at least 10 servings, so it is really good for leftovers. Make sure to top it with your favorites - I chose to top mine with grated cheddar cheese, avocado slices, and tortilla chips. Enjoy!

Recipe for White Chicken Chili-Soup 

INGREDIENTS:
3 Tbsp. of Extra-Virgin Olive Oil
5 (5 - 6 ounce) skinless & boneless chicken breasts, cubed
2 large yellow onions, chopped
6.5 cups of chicken broth
2 (4 ounce) cans of diced green chiles
2 tsp. of garlic powder
1 Tbsp. of ground cumin
1 1/2 tsp. of dried oregano
1/2 tsp. of cayenne pepper
A dash or two of salt
2/3 cup of fresh cilantro leaves
4 (15.5 ounce) cans of cannelini beans
Juice of 1/2 lime
Toppings: cheddar cheese, sliced avocados, tortilla chips, sour cream
DIRECTIONS:
Heat the olive oil in a large pot set over medium-high heat. Put in the chicken pieces and chopped onion and cook for about 5 minutes, stirring frequently. Add in the chicken broth, green chiles, garlic powder, cumin, oregano, cayenne pepper, salt, and cilantro. Allow the mixture to come to a boil and then immediately reduce the heat to medium-low and simmer for 15 - 20 minutes. Add in the beans and simmer for another 5 minutes. Make sure that the chicken is cooked all the way through (I usually take a piece out and cut into it with a knife to make sure the inside is not pink, that way I know it's done). Turn the heat off and then squeeze in the lime juice. Stir soup, and season to taste. Serve each bowl of soup with your favorite toppings.

Recipe Adapted from: All Recipes 

Wednesday, November 21, 2012

The Best Pumpkin Pie with Homemade Whipped Cream


Oh, pumpkin pie - how I love you. If you are still looking for the perfect recipe for pumpkin pie this Thanksgiving, look no further, because you have come to the right place. This pumpkin pie is incredible. The secret is in the sweetened condensed milk - it makes for a really nice consistency, and it enhances the flavors of the cinnamon, nutmeg, and ginger.

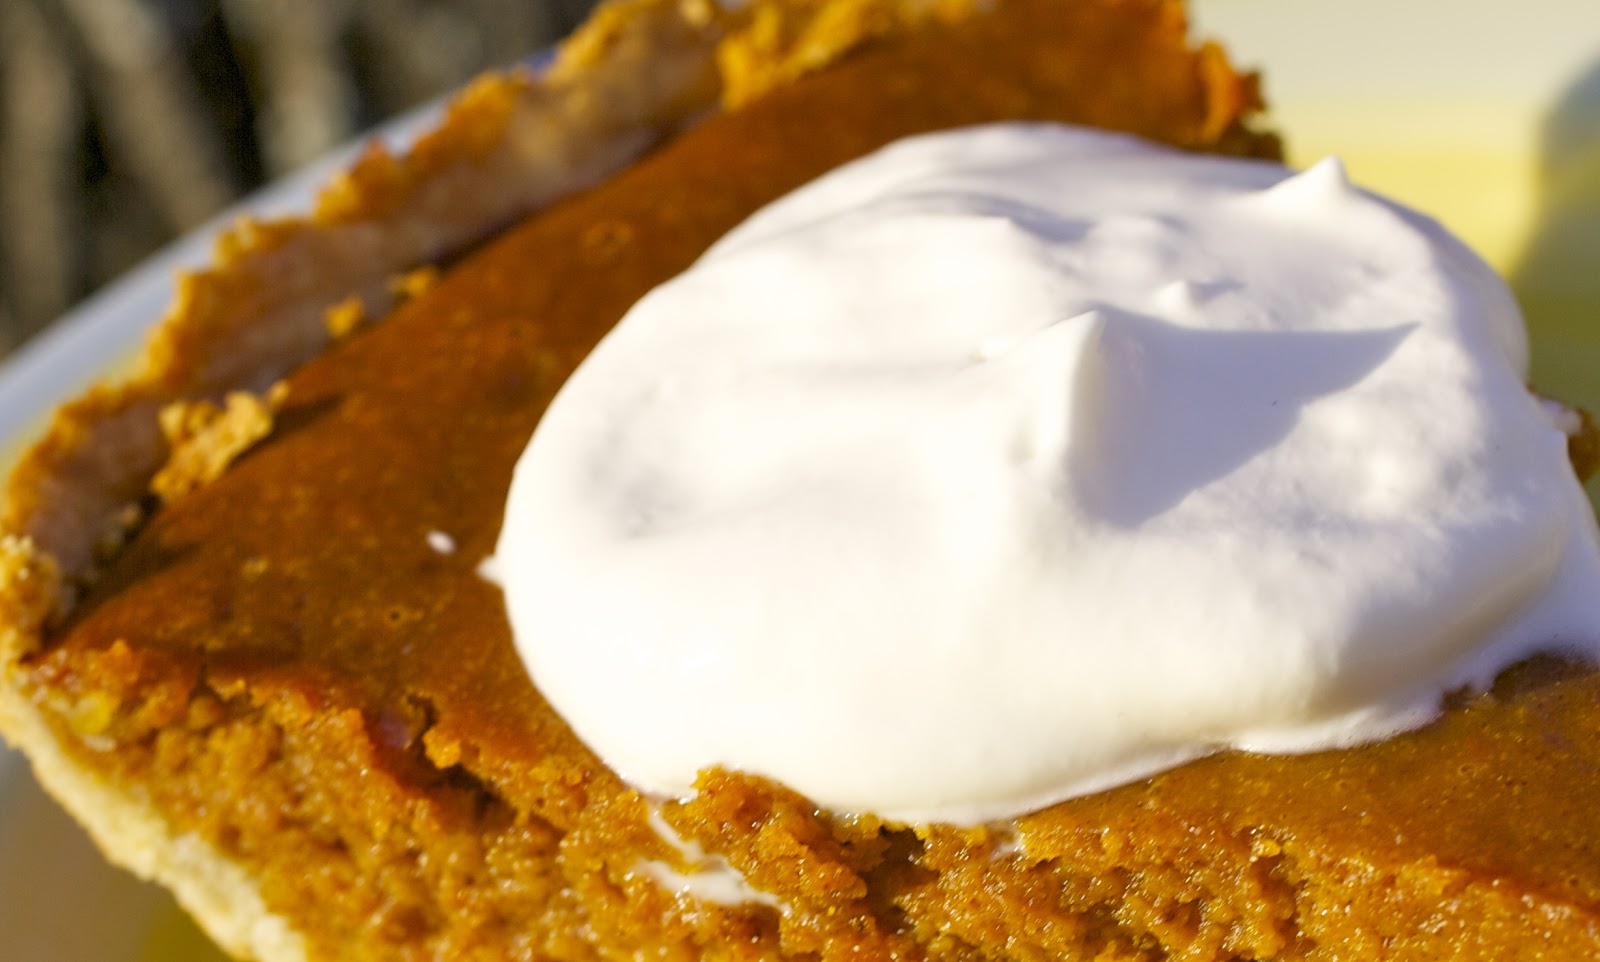
I first came across this recipe last winter. I will never try another recipe for pumpkin pie again, because this one really is the absolute best. This pie taste delicious when it is warm or cold, and it is great with or without whipped cream. But since whipped cream makes everything better, I usually opt for a piece topped with whipped cream. If you have never had homemade whipped cream, you are missing out. Once you have it, you probably will never buy store-bought whipped cream again.

I hope everyone has a very happy Thanksgiving! I have a lot to be thankful for, but today I'm especially thankful for pumpkin pie!

Recipe for the Best Pumpkin Pie with Homemade Whipped Cream

For the pie crust
INGREDIENTS:
1 1/4 cups of all-purpose flour
1 Tbsp. of granulated sugar
1/4 tsp. of kosher salt
1 stick of very cold butter, chopped into small chunks
3 - 4 Tbsp. of ice-cold water
DIRECTIONS:
Place the flour, salt, and sugar into the bowl of a food processor fitted with a metal blade. Pulse briefly to just combine. Add in the very cold pieces of butter. Pulse several times until the mixture resembles coarse crumbs (about the size of peas). With the food processor running, slowly pour a tablespoon of the water through the feed tube. Continue to pour in more water, a tablespoon at a time. After you have poured in 3 tablespoons of water, add in the fourth tablespoon if the dough has not yet left the sides of the bowl. Allow the food processor to keep running until the dough completely leaves the sides of the bowl and forms into a ball. Carefully remove the dough from the food processor and wrap in saran wrap or seal in a plastic bag. Put into the refrigerator for 45 minutes.
For the pumpkin pie filling
INGREDIENTS:
1 14-ounce can of pumpkin
1 14-ounce can of sweetened condensed milk
2 eggs, beaten with a fork
1/2 cup of light brown sugar, packed
2 Tbsp. of granulated sugar
1 1/2 tsp. of ground cinnamon
1/2 tsp. of ground ginger
1/2 tsp. of ground nutmeg
1/2 tsp. of salt
1/4 tsp. of ground cloves
1/8 tsp. of vanilla extract
DIRECTIONS:
Place all of the ingredients into a large mixing bowl. Beat the ingredients together with an electric hand mixer set on medium speed for two minutes.
For assembly and cooking
Preheat the oven to 425 degrees.
Take the dough out of the fridge. Place it into a 9 to 10-inch pie pan. Use your hands to firmly press and work the dough so it is evenly distributed onto the bottom and the sides of the pan. Pour the pumpkin pie filling mixture into the pan. Place the pie pan into the oven and cook for 15 minutes. After 15 minutes, lower the oven temperature to 350 degrees. Cook for another 45 - 50 minutes. Cool the pie on a cooling rack for at least 20 minutes before serving. Makes 8 - 12 servings.

Pie Crust Recipe Source: Annie's Eats
Pumpkin Pie Recipe Source: Food.com


Recipe for Whipped Cream
INGREDIENTS: 
1 cup of heavy whipping cream (chilled)
1 Tbsp. of confectioners sugar (powdered sugar)
DIRECTIONS:
Place a medium to large metal mixing bowl and the whisk attachment for an electric hand mixer into the freezer. Let chill for about 10 minutes. Once chilled, pour the cup of heavy whipping cream into the bowl. Attach the chilled whisk to the electric hand mixer. Beat the cream on high speed for about one to two minutes, then add in the powdered sugar. Continue to beat on high speed for several minutes, or until the cream starts to form soft peaks. This recipe makes enough whipped cream to serve on each piece of pie (or at least it should)! 

Saturday, November 17, 2012

Chocolate Marshmallow MADNESS!


I thought I was making up a new truffle recipe when I made these, and the name of the truffles were going to be "chocolate marshmallow madness truffles." But then I realized they weren't really like truffles, because they turned out to be more like chocolate marshmallow yumminess and gooeyness - covered in chocolate. Yes, I really did make something chocolate and covered it with chocolate - and it was wonderful.

This recipe was inspired by the frosting on the ice cream cone cupcakes. I tried making these once before, but the butter did not work too well in the recipe. So I omitted the butter this time, added some mini chocolate chips to the mix, and it was a success. My coworkers approved, Greg approved, and I hope you will also approve of the madness! Make sure to enjoy the chocolate marshmallow madness with a glass of milk.

Recipe for Chocolate Marshmallow MADNESS! 

INGREDIENTS:
For the inside:
2 7-ounce jars of marshmallow creme
1 1/4 cups of chocolate chips (regular sized)
1/4 cup of cocoa powder
1/2 tsp. of vanilla extract
1 - 1 1/2 cups of mini chocolate chips (depending on your desired amount of chunkiness)
For the coating:
16-ounces of semisweet baking chocolate squares, broken in half

DIRECTIONS:
For the inside:
Melt the 1 1/4 cups of regular-sized chocolate chips in a smallish saucepan set over medium-low heat, stirring occasionally. Remove the chocolate from heat once it is melted and smooth. Set aside to cool slightly.
Put the marshmallow creme, cocoa powder, and vanilla extract into a large mixing bowl. Add in the slightly cooled melted chocolate and the mini chocolate chips. Using an electric hand mixer set on medium-low speed, beat the mixture together for a couple minutes until it is smooth and all ingredients are well incorporated. Stir in more mini chocolate chips, if desired. Cover the bowl with a lid and put it in the fridge for several hours, preferably overnight.
After mixture has been refrigerated, line a couple freezer-safe containers with parchment paper. Take the mixture out of the fridge and use a cookie dough scoop to form the marshmallow filling. Scoop a little out and roll into 1-inch (or larger) balls. Place each one onto the parchment lined containers. Cover the containers with foil and place in the freezer for a few hours (or more).
For the coating:
Line a baking sheet with parchment paper.
Place the broken squares of baking chocolate into a medium-sized saucepan. Prepare a double boiler with about 1/2 cup of water, and set the double boiler over medium heat. Once steam starts to come up through the boiler, set the saucepan of chocolate on top. Allow the chocolate to melt, stirring frequently. Once the chocolate melts, turn off the heat. Take the chilled chocolate marshmallows out of the freezer. Drop each one into the melted chocolate one at a time and use a spoon to coat. Use the spoon to carefully place each one onto the prepared baking pan. Once you have coated each one, place baking sheet into the refrigerator. Allow the chocolate to harden. Once the chocolate has hardened, they are ready to eat. I found that they actually taste best at room temperature, so you can take them out of the fridge to sit until they are ready to be served.

Wednesday, November 14, 2012

Spinach, Pear & Cacao Nib Salad


I love this salad! It was served at my wedding, and this was my first time having it since then. I borrowed the Scharffen Berger cookbook from my mother's house, and when I saw the recipe for the salad I knew that I had to make it. The salad is very tasty and pretty healthy. The crunch and flavor of the cacao nib in the salad is amazing. Chocolate works well in everything! Enjoy.

Recipe for Spinach, Pear & Cacao Nib Salad
INGREDIENTS:
Chocolate, in a salad? YES! 
For the salad
8 Cups of Baby Spinach Leaves
1 Ripe Red Bartlett Pear, sliced
1 Ripe Bosc Pear, sliced
1/3 cup of chopped toasted walnuts
1 Tablespoon of cacao nibs
Coarse Salt & Freshly Ground Pepper

For the Cacao Nib Vinaigrette
1 Tbsp. of balsamic vinegar
1 tsp. of cacao nibs
1/4 cup of extra virgin olive oil

DIRECTIONS:
Put the vinegar into a small bowl and stir in the cacao nibs. Slowly pour in the olive oil and whisk.
Place the baby spinach leaves, sliced pears, toasted walnuts, and cacao nibs into a large salad bowl. Pour on the vinaigrette and toss well. Season the salad with a pinch of coarse salt and some freshly ground black pepper. Divide amongst bowls. Serves 3.

Recipe Source: The Essence of Chocolate, Recipes for Baking & Cooking with Fine Chocolate

NOTE: Do you love the crunchiness of cacao nibs? I think you'll love this recipe for fudge...!


Saturday, November 10, 2012

Curried Pumpkin Mushroom Soup

 Please visit my new blog, Make It and Bake It with Beth, for the curried pumpkin mushroom soup recipe. 


Tuesday, November 6, 2012

Easy Fudge with Cacao Nibs


Happy Election Day! I hope you voted or plan to vote. I vote this fudge for president - it will not disappoint you!

I love this fudge recipe. Not only is the fudge delicious, but it is SO easy to make. I like the fact that I can make the fudge without the use of a candy thermometer. Whenever I try to make something that requires a reading on a candy thermometer, I always lose patience and figure that 5 - 10 degrees lower should suffice. And it never does...

This fudge has a subtle coffee flavor with a hint of cinnamon. The texture is smooth and creamy, and you will love the slight crunch from the cacao nibs. I shared some of this fudge at work yesterday, and it was quite the hit. My coworkers also vote yes to this fudge, and I hope that you will too. Enjoy!

Recipe for Easy Fudge with Cacao Nibs

INGREDIENTS:
4 Tbsp. of unsalted butter
1 7-oz. jar of marshmallow cream
2/3 cup of heavy whipping cream
1/2 cup of granulated sugar
1 1/4 tsp. of instant ground coffee
1/4 - 1/2 tsp. of cinnamon
1/4 tsp. of salt
12 ounces of semisweet baking chocolate (62% cocoa), very finely chopped
1 - 2 tsp. of SCHARFFEN BERGER cacao nibs

DIRECTIONS:
Carefully fit a piece of foil into the bottom and on all four sides of an 8 x 8 pan. Very lightly grease the foil in the pan with the end of a stick of butter.
Put the baking chocolate into the bowl of a food processor fitted with a metal blade. Pulse until the chocolate is chopped very finely. Set aside.
Place the butter, marshmallow cream, heavy cream, sugar, ground coffee, cinnamon, and salt into a medium sized saucepan. Set it over medium heat. Stir to combine the ingredients and allow it to come to a boil. Once it boils, stir it constantly for about 4 - 5 minutes. Then remove the saucepan from heat and immediately pour in the chocolate, and stir until the mixture is completely smooth. Pour the mixture evenly into the prepared pan. Sprinkle the cacao nibs on top of the fudge mixture. Cover the pan with foil and store in the fridge until it hardens, about 4 hours.
Carefully remove the foil from the fudge. Use a long sharp knife to cut it into desired size pieces. Store fudge in the fridge in an airtight container. Enjoy!

Recipe Adapted from: Annie's Eats

Saturday, November 3, 2012

Quiche with a Homemade Buttery Crust


I remember that my mom used to the best quiches for dinner. Nobody's quiche could ever compare to hers! When I threw Carrie's shower back in October, I did a brunch theme. I thought homemade quiche would be great to have on the menu. I had never made quiche, so I asked my mom to send me her favorite quiche recipe. I made a couple of quiches with bacon and one without bacon for the shower. The quiches were really good - the crust buttery, the filling creamy, and every bite melted in the mouth!

I had some eggs that needed to be used, so I decided to make another quiche for dinner last week. This time I just made the quiche without the bacon.  One nice thing about the quiches is that the crust can be made ahead of time. When I threw Carrie's shower, I made all of the crusts the night before and tightly covered them in foil and left at room temperature. It saved a lot of time! I'm glad I tried out the quiche recipe, and I know it will be a meal I make often. Enjoy!

Recipe for Quiche with a Homemade Buttery Crust

INGREDIENTS:
For the crust
1 1/3 cup of all-purpose flour
1/4 tsp. of kosher salt
1 stick of well-chilled unsalted butter, cut into several pieces
2 - 3 Tbsp. of ice cold water
For the filling
2 large eggs
2 large egg yolks (I love this gadget to separate the yolk)
2/3 cup of heavy cream
2/3 cup of whole milk
1/4 tsp. of salt
1/4 tsp. of ground black pepper
a pinch or two of ground nutmeg
1 cup of grated swiss cheese
4 ounces of cooked bacon, cut into small pieces (optional)

DIRECTIONS:
For the crust
Place the flour and salt into the bowl of a food processor fitted with a metal blade. Pulse a couple times to combine. Add in the pieces of butter to the bowl. Pulse several times until the mixture resembles coarse crumbs. With the food processor running, slowly pour 1 tablespoon of the water through the feed tube. Add in 1 more tablespoon of water. If the dough does not leave the sides of the bowl after several seconds, add in the remaining tablespoon of water. Once dough leaves the sides of the bowl and forms into a ball, turn the processor off. Carefully remove the ball of dough, slightly flatten it into a disc, and cover it in saran wrap. Place in the fridge for at least an hour. 

Remove the dough from the fridge. Press the dough into the bottom and up onto the sides of a 9.5-inch pie plate. Place the dough back in the fridge for 30 minutes. 

When ready to cook, preheat the oven to 375 degrees. Fit a piece of parchment paper into the pie plate to cover the dough on the bottom and the sides. Fill the pie plate with pie weights or dried beans. Place the pie plate into the preheated oven and cook for about 13 minutes. After 13 minutes, carefully remove the pie plate from the oven. Then carefully remove the parchment paper and pie weights/beans. Place the pie plate back into the oven and cook for another 8 - 10 minutes. Remove from oven and place on a cooling rack. While it is cooling, make the filling. 

For the filling
Place the eggs, egg yolks, cream, and milk into a medium-sized bowl. Use a fork or whisk to beat well. Add in the salt, pepper, and nutmeg and mix it in. Stir in the cheese. 

For assembling
If using the bacon, arrange it in a single layer on the bottom of the slightly cooled pie crust. Pour the egg, cream, and cheese mixture into the crust. (If not using bacon, just pour the egg mixture into the pie crust). Place back into the oven and cook for about 35 - 40 minutes, or until golden in color. The quiche will still wiggle a little in the middle - you can check doneness by inserting the edge of a butter knife into the middle of the quiche, if it comes out clean the quiche is done. Remove from oven and let it cool slightly before serving. Makes 8 one-piece servings.