Translate

Showing posts with label party foods. Show all posts

Tuesday, November 15, 2016

Chocolate Chip Cookie Dough Cupcakes

Guess what? You need these chocolate chip cookie dough cupcakes in your life right now. I bet it is dark when you are waking up in the morning and even darker when you are coming home after an exhausting day at work, and there is probably not too much that can get you out of your funk.  These chocolate chip cookie dough cupcakes are here to help. Just like the cookie dough truffles, there is no raw egg in the cookie dough filling. The mixture is made up everything that is good in life,  like butter, brown sugar, condensed milk, flour, vanilla, and chocolate chips. 

I got together with a friend a few weekends ago, and we made these cupcakes for the first time. I had seen them before and thought about making them, but I always thought they looked too involved. Hey, they really are a little involved, but they aren't too tricky, and they are well worth the extra time in the kitchen.

So, what are you waiting for? Go make some chocolate chip cookie dough cupcakes and put a smile back on that face. Enjoy!

Recipe for Chocolate Chip Cookie Dough Cupcakes

INGREDIENTS
For the cupcakes
3 sticks of unsalted butter, at room temperature
1 1/2 cups of light brown sugar, packed
4 large eggs
2 2/3 cup of all-purpose flour
1 tsp. of baking powder
1 tsp. of baking soda
1/4 tsp. of salt
1 cup of 2% or whole milk
2 tsp. of pure vanilla extract
1 cup of semisweet chocolate chips

For the cookie dough filling
4 Tbsp. of unsalted butter, at room temperature
6 Tbsp. of light brown sugar, packed
1 cup plus 2 Tbsp. of all-purpose flour
7 ounces of sweetened condensed milk
1/2 tsp. of pure vanilla extract
1/3 cup of semisweet chocolate chips (regular or miniature)

For the cookie dough frosting
2 sticks of unsalted butter, at room temperature
2 1/4 cup of powdered (confectioners') sugar
2/3 cup of all-purpose flour
1/2 tsp. of salt
2 Tbsp. of milk
2 tsp. of pure vanilla extract

Extra chocolate chips, for topping cupcakes

DIRECTIONS
For the cupcakes
Preheat the oven to 350 degrees. Line two cupcake pans with paper liners. Put the butter and the brown sugar in a large mixing bowl and use an electric hand mixer to mix on medium high speed until light and fluffy, about 3 - 4 minutes. Then add in the eggs one at a time, beating well after each addition.

Combine the flour, baking powder, baking soda, and salt in a medium mixing bowl and stir together. Add one third of the flour mixture into the butter mixture and beat on low speed, then add 1/2 cup of the milk and beat again on low speed. Continue alternating and end with the dry ingredients, mixing each time until just incorporated. Add in the vanilla extract and mix. Fold in the chocolate chips.
Divide the batter evenly into the paper liners. Bake for 18 - 20 minutes, or until a toothpick inserted in the center of the cake comes out clean. Allow the cupcakes to cool in the pan for 10 minutes, then transfer to a wire rack and let cool completely.

For the cookie dough filling
Once cupcakes are in the oven, make the cookie dough filling. Combine the butter and sugar in a mixing bowl and mix on medium high speed with an electric had mixer until light and fluffy, about 3 minutes. Then mix in the flour, sweetened condensed milk, and vanilla extract and mix until smooth. Stir in the chocolate chips. Cover the bowl and put in fridge until mixture is firm, about one hour.

To stuff the cupcakes
When cupcakes are cooled, add in the cookie dough! Cut a cone-shaped portion (or use a spoon and scoop) out of the center of each cupcake. Fill each hole with a ball of the cookie dough mixture. Use all of the filling to stuff the cupcakes - the more you have, the better the cupcake!

For the frosting
Put the butter and brown sugar into a medium mixing bowl and use an electric hand mixer set on medium high speed to beat until creamy. Add in the confectioners' sugar and mix until smooth. Add in the flour and salt and mix until just incorporated. Pour in the milk and vanilla extract and beat until smooth and well incorporated.

Frost the cupcakes, top with chocolate chips, and celebrate!

*Recipe makes approximately 2 dozen cupcakes.
Store cupcakes in an airtight container in the fridge.

Monday, January 18, 2016

Spinach Balls

Please visit my new blog, Make It and Bake It with Beth, for the spinach balls recipe

Friday, April 3, 2015

Cinnamon Spiced Nuts (No Egg White)!

A couple weeks ago, I had dinner at one of my favorite restaurants in Annapolis, Vin 909. Usually I only order the pizza when I eat there, but this time I decided to start with a salad so that maybe I would eat less pizza (that kind of happened - I ate one or two less slices than usual). The salad that I had was topped with dried figs, blue cheese, and cinnamon spiced nuts. The best part of the salad was definitely the nuts. A couple days after eating out, I googled recipes for cinnamon spiced nuts, and I was disappointed that almost all the recipes I came across recipes called for egg whites, because sometimes I just don't feel like dealing with egg whites! After awhile, I finally came across a recipe that only used water, sugar, and cinnamon. I read the reviews and learned that most people said that the recipe was a success, so I gave it a try. Oh, they were so good! Greg said they tasted better than the nuts that people buy at sporting events for $5 a handful. Greg and I loved snacking on the cinnamon nuts throughout the week, and yesterday I made a salad with them, and it was absolutely delicious. The picture you see of the cinnamon spiced nuts is actually from the salad I made, and I will share that recipe soon. Today I am sharing the recipe for these amazing sweet cinnamon spiced nuts that are made without any egg white! Enjoy.

Recipe for Cinnamon Spiced Nuts (No Egg White)!

INGREDIENTS:
1 cup of almonds (you can try other nuts, but I think almonds probably work best)
1 1/2 Tbsp. of water
1/3 cup of granulated sugar
1 1/2 tsp. of ground cinnamon
A couple grinds of sea salt
A pinch or two of ground cayenne pepper (optional)

DIRECTIONS:
Put the almonds, water, sugar, cinnamon, salt, and cayenne pepper (if using) into a large nonstick skillet. Set the skillet over medium heat and stir, constantly, for about 10 - 15 minutes. At first the mixture will be watery, then a little syrupy, and then the almonds will have a sugar coating on them. Once they are coated with the sugar, carefully pour them onto parchment paper or a silicone baking mat and spread them out a bit with a spatula. Allow them to cool completely before storing in an airtight container. They do taste good warm though so feel free to snack on them while they are cooling! These nuts are great for snacking or topping on salads. 

Recipe Adapted from: One Charming Party

Saturday, May 4, 2013

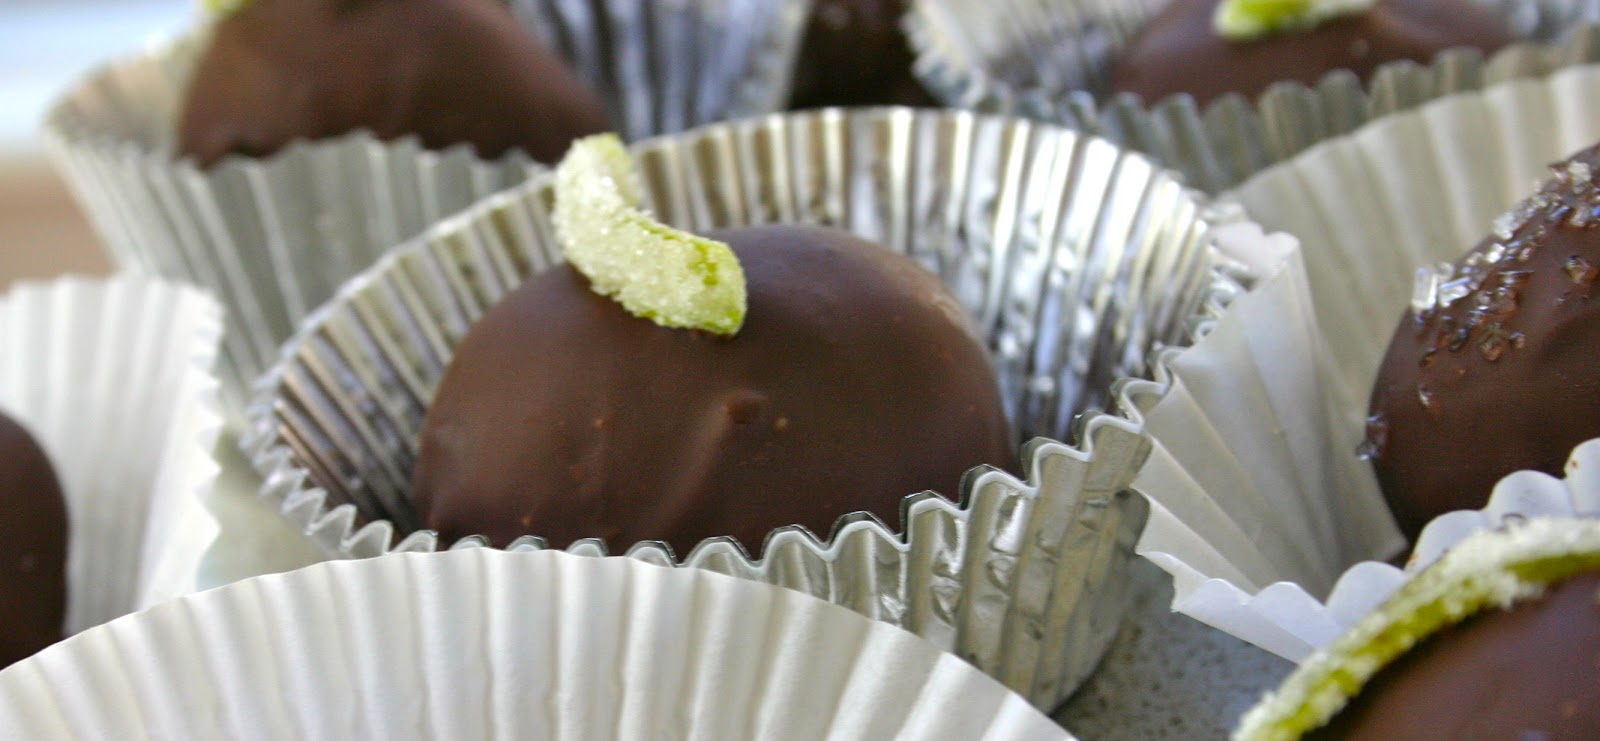
Dark Chocolate Lime Truffles with Candied Lime Peel

I made another type of truffle this week. The recipe was something I hadn't even planned on, and I'm glad it worked. All week long I was wanting to make lemon truffles with bittersweet chocolate. After getting home from work on Tuesday, I started getting the ingredients together for the truffles. And to my surprise, I was completely out of lemons. I drove over to the corner store, hoping they had lemons, but all they had was lemon juice. So I didn't make any truffles on Tuesday. On the way home from work Wednesday, I had every intention of stopping at the grocery store for lemons. But I was so focused on making sure I got through the green traffic light ahead of me that I forgot to turn left to go to the store. I'm always in a hurry, just like everyone else in this world. The guy at the corner store had told me on Tuesday that they might have lemons the next day, so I stopped there again, but I didn't have any luck. I really wanted to make those lemon truffles, but since all I had was limes,  I decided I would try lime truffles instead. I couldn't find any recipes on the web for truffles with dark chocolate and lime, so I wondered if they would even be any good. I trusted my instincts though, and I made the lime truffles. I basically followed the same recipe I use when I make the lemon truffles, but used lime zest and lime juice. I used Scharrfen Berger bittersweet chocolate for the filling and coating of the truffles. They turned out pretty amazing, and I love them. I totally made something with lime just in time for Cinco de Mayo too, and I'm pretty proud of that. I'll be serving them for dessert after my Cinco de Mayo dinner. And then I'll share the rest of them at work on Monday! Hope you have the best Cinco de Mayo ever - I know I will.

Recipe for Dark Chocolate Lime Truffles with Candied Lime Peel

INGREDIENTS:
For the truffle filling
3/4 cup plus 2 Tbsp. of heavy whipping cream
3 tsp. of lime zest
9.7 - 10 ounces of bittersweet chocolate (70% cocoa)
2 Tbsp. of freshly squeezed lime juice
Cocoa powder, to help with rolling
For the truffle coating
9.7 - 10 ounces of bittersweet chocolate (70% cocoa)
For topping 
2 medium limes
2 Tbsp. of water
1/2 cup granulated sugar, divided
Decorative sugar (optional)

To make the candied lime peel, use a vegetable peeler to grate strips of the lime peel. Use a knife to cut the grated peels into 3/4-inch long and 1/4-inch thick pieces. Place the water and 1/4 cup of the sugar into a small saucepan and set over medium-high heat. Bring to a boil, stirring almost constantly, until the sugar is fully dissolved. Add in the lime peel, put heat on low, and cover. Allow to cook for 3 minutes. Remove from heat, uncover, and allow to cool completely. After cooling, drain through a fine mesh sieve/strainer. Separate the lime peels and place onto a large plate lined with parchment paper and let dry. Once dried, put lime peels into a bowl and add in the remaining 1/4 cup of sugar. Toss until the lime peels are coated with the sugar. Set aside until ready to use for topping truffles. You will probably have more candied lime peel than you will need - pick out the prettiest ones to top the truffles with & save the rest for nibbling!

TRUFFLE DIRECTIONS:
For the truffle filling
Finely chop the chocolate by breaking it into squares and placing in the bowl of a food processor fitted with a metal blade. Pulse until the chocolate is finely chopped. Leave chocolate in food processor bowl until ready to use.

Put the heavy whipping cream and lime zest in a medium-sized saucepan and set over medium heat. Cook until the cream just comes to a simmer, then remove from heat and immediately pour in the finely chopped chocolate. Cover the saucepan and let it sit for 5 minutes. After 5 minutes, stir the cream and chocolate together very gently until the mixture is smooth. Add in the lime juice and stir until just combined. Pour the mixture into a bowl and cover tightly with a lid or with plastic wrap. Put in the fridge for several hours, preferably overnight.

Line the bottom of freezer-safe containers with foil or parchment paper. Take the chocolate lime mixture out of the fridge. Dust your hands with cocoa powder, have ample supply of paper towels nearby (because your hands will get messy), and use a cookie dough scoop to scoop up the mixture. Use your hands to roll each scoop into a 3/4-inch ball, then place in a single layer in the prepared containers. Cover the containers with a lid and place in the freezer for at least 2 hours.

For the truffle coating
Line a baking sheet with parchment paper. Prepare the bottom pan of a double boiler by adding water. Use a sharp knife and cutting board to cut the dipping chocolate into smallish pieces. Place the chocolate in the double boiler saucepan. Place the bottom pan of the double boiler over medium heat, and when the water begins to simmer and steam rises, place the saucepan with the chocolate on top of the boiler. Stir the chocolate frequently until is is completely melted and smooth. Turn off the heat. Take the balls out of the freezer. Drop one or two at a time into the chocolate mixture, and use a spoon to coat completely with the chocolate. Gently drop on the prepared baking sheet and top with a candied lime peel. Sprinkle with a little bit of decorative sugar, if desired. Continue this process, working quickly, until all of the truffles are dipped and topped. Place the pan into the fridge and allow the chocolate to harden. They should be ready to eat after about 20 minutes. Store in an airtight container in the fridge. Enjoy!

Recipe makes 25 - 30 truffles.


Candied lime peel recipe adapted from Cooking Light

Saturday, January 26, 2013

Greek Pizza with a Cornmeal Crust


Greg got me a pizza stone for Christmas (he also got me a Kindle Fire & an Epilady). What did I get Greg? I got him a hat and a tie. I'm pretty boring.

Before receiving the pizza stone, I always wondered why my pizza crusts would NEVER work out to my liking. Well, the answer is that I had never used a pizza stone. What a difference it makes! It helps to cook the pizza evenly, and it helps to extract moisture (from cheese, toppings, etc.) When I had used a baking sheet to cook pizzas, the moisture from cheese would seep into the crust and it would become a soggy mess.

The very first (and second) pizza I made with the stone was a Greek pizza. The pizza starts with a cornmeal crust, then it is spread with an olive oil & roasted garlic sauce, and it is topped with feta cheese, mozzarella, sun dried tomatoes, kalamata olives, arugula, and spices. It is absolutely amazing! Greg and I are thinking of having some friends over for the Superbowl to enjoy the game and Greek pizza together (but I'll enjoy the pizza more, even though my home team is playing my nephew's home team). I just like food way more than I like football. Enjoy!

Recipe for Greek Pizza with a Cornmeal Crust

INGREDIENTS:
For the crust
1 1/2 cups all-purpose flour
1/2 cup cornmeal
3/4 tsp. kosher salt
2 tsp. active dry yeast
pinch of sugar
2/3 cup of warm water (about 110 degrees)
2 Tbsp. of extra-virgin olive oil

DIRECTIONS:
Put the warm water in a liquid measuring cup. Add yeast and sugar and let sit for ten minutes until a bit bubbly. Put flour, cornmeal, and kosher salt into a food processor and pulse together. Slowly add in the olive oil. With the food processor running, slowly add in the water/yeast mixture through the feed tube. When it forms into a ball, stop and divide the dough into two even pieces. Wrap one piece in plastic wrap and refrigerate or freeze for another use. Place the other piece of dough in a bowl coated with olive oil, and cover the bowl with plastic wrap or a  warm moist towel. Put somewhere warm  (like on top of the warm oven while the garlic is roasting). Let the dough rise for about an hour.

For the roasted garlic & olive oil sauce
2 large heads of garlic, with much of the skin peeled off
5 Tbsp. of extra-virgin olive oil, divided
a pinch of lemon zest (optional)
1/8 tsp. oregano
salt and pepper
a pinch of red pepper flakes
6 sundried tomatoes in oil, chopped small

Line a baking sheet with foil. Pour a couple tablespoons of the olive oil on the foil. Place garlic on top of foil. Place in an oven heated to 375 degrees and cook for 45 minutes. Let the garlic cool slightly, then use your hands to squeeze the garlic out into a bowl. Add the remaining ingredients and mix well, forming a bit of a paste while doing so. Set aside.

For topping & assembling
3 - 4 ounces of grated mozzarella cheese
5 ounces of crumbled feta cheese
10 - 12 kalamata olives, sliced thin
3 - 4 sun dried tomatoes in oil, sliced small
A handful or two of arugula leaves
A drizzle of olive oil
Dried Oregano
Black Pepper
Crushed Red Pepper flakes

Preheat pizza stone according to manufacturer's directions (most stones need to be at 500 for thirty minutes).

After the dough has risen, place it on an inverted baking sheet dusted generously with cornmeal. Spread out the dough to make a thinnish crust. Drizzle the dough with the roasted garlic & olive oil sauce, spreading evenly. Then top with most of the mozzarella cheese, add the feta cheese, add the olives and sun dried tomato, add a little more mozzarella, then add the arugula. Drizzle the arugula with a little olive oil and then top the pizza with a sprinkle of dried oregano, crushed red pepper flakes, and black pepper.

Once pizza stone is ready, carefully slide the pizza onto the stone (leave stone in oven). Cook for about 6 - 7 minutes, or until crust is done and cheese is melted. Remove the pizza from the oven, let cool for a minute, slice and serve.
Greg & I enjoy our pizza with a small arugula salad topped with olives, feta, olive oil, crushed red pepper flakes, and a touch of balsamic vinegar.

Cornmeal crust recipe adapted from: Martha Stewart

Thursday, July 19, 2012

Sweet, Spicy & Super Yummy Marinated Shrimp


I'm sure glad I found this photo of the sweet and spicy shrimp that was served at my wedding in June 2008. I took pictures of the shrimp yesterday, but my pics really didn't do it any justice. I didn't want to photograph it outside in natural light because it was SO hot yesterday. Also, my photographer/husband was at work, so it was me behind the camera....

The marinated shrimp is super yummy. This is another recipe that has been passed down to me from my mother. I have served this shrimp at wedding showers and baby showers, and it is always a hit. It was also a hit at the wedding! 

It's a great appetizer, but it also serves well as a meal if you add your favorite veggies or other sides. We had it last night and the night before with Caribbean-style corn and carrot and oat rolls. YUM. 

I love the flavor of this shrimp. Greg says it's the best shrimp dish he has ever had, because it is marinated so well that it doesn't even taste like seafood! The marinated shrimp is really easy to make and requires barely any prep time - but since it has to marinate, it needs to be made several hours ahead of time before serving. But, once it finishes marinating, you're done - all you need to do is sprinkle with some salt and pepper! Enjoy.

Recipe for Sweet, Spicy & Super Yummy Marinated Shrimp

INGREDIENTS:
2 pounds of easy peel & deveined raw frozen shrimp
1 large lemon, sliced and divided
1 cup of red wine vinegar
1 jalapeno, coarsely chopped, seeded & deveined (leave seeds for more heat)
1 1/2 Tbsp. of dried onion flakes
1 1/2 tsp. of garlic powder
1/3 cup of granulated sugar

DIRECTIONS:
Bring a large  pot of water to boil. Once it boils, add in half of the lemon slices and some sprinkles of Old Bay seasoning. Add in the shrimp and cook according to package directions.

Once the shrimp is finished cooking, remove the lemon slices and drain the shrimp in a colander. Immediately rinse with very cold water. Set aside.

While shrimp is cooling, make the marinade. Add the red wine vinegar, garlic powder, onion flakes, jalapeno slices, remaining lemon slices, and sugar to a small pot. Put the pot over medium heat and stir occasionally until the mixture becomes hot and sugar fully dissolves, about 3 - 4 minutes. Remove pot from heat and set aside to cool.

While marinade is cooling, shell the shrimp. Make sure excess water is drained from the shrimp before shelling. Put the fully shelled shrimp into a large bowl.

Remove the lemon slices from the marinade. Pour the marinade over the shrimp in the large bowl. Add in the cilantro. Sprinkle with salt and pepper and toss everything together. Cover the bowl with a lid, shake the bowl, and put into the fridge for at least 8 hours.

When ready to serve, sprinkle the shrimp with a little bit of extra salt and pepper. Remove the jalapeno pepper pieces if desired (I of course left them in). Serve as an appetizer or as a meal with your favorite sides.

Recipe Adapted from: All Recipes

The marinated shrimp reminded me of my wedding day!
My mom made the wedding cake + several more cakes...


NOTE:
If the shrimp is served at a party where guests will be serving themselves, make sure to bring it out immediately before the food line opens. If it needs to sit out for more than 15 minutes, put it on ice.